IOU Quickstart Tutorial
In this guide, you will learn about developer tools and DAML applications by:
- developing a simple ledger application for issuing, managing, transferring and trading IOUs (“I Owe You!”)
- developing an integration layer that exposes some of the functionality via custom REST services
Prerequisites:
- You understand what an IOU is. If you are not sure, read the IOU tutorial overview.
- You have installed the SDK. See installation.
Download the quickstart application
You can get the quickstart application using the DAML assistant (daml):
Run
daml new quickstart --template quickstart-javaThis creates the
quickstart-javaapplication into a new folder calledquickstart.Run
cd quickstartto change into the new directory.
Folder structure
The project contains the following files:
.
├── daml
│   ├── Iou.daml
│   ├── IouTrade.daml
│   ├── Main.daml
│   ├── Setup.daml
│   └── Tests
│       ├── Iou.daml
│       └── Trade.daml
├── daml.yaml
├── frontend-config.js
├── pom.xml
└── src
    └── main
        ├── java
        │   └── com
        │       └── digitalasset
        │           └── quickstart
        │               └── iou
        │                   └── IouMain.java
        └── resources
            └── logback.xml
daml.yamlis a DAML project config file used by the SDK to find out how to build the DAML project and how to run it.damlcontains the DAML code specifying the contract model for the ledger.daml/Testscontains test scenarios for the DAML model.frontend-config.jsandui-backend.confare configuration files for the Navigator frontend.pom.xmlandsrc/main/javaconstitute a Java application that provides REST services to interact with the ledger.
You will explore these in more detail through the rest of this guide.
Overview of what an IOU is
To run through this guide, you will need to understand what an IOU is. This section describes the properties of an IOU like a bank bill that make it useful as a representation and transfer of value.
A bank bill represents a contract between the owner of the bill and its issuer, the central bank. Historically, it is a bearer instrument - it gives anyone who holds it the right to demand a fixed amount of material value, often gold, from the issuer in exchange for the note.
To do this, the note must have certain properties. In particular, the British pound note shown below illustrates the key elements that are needed to describe money in DAML:
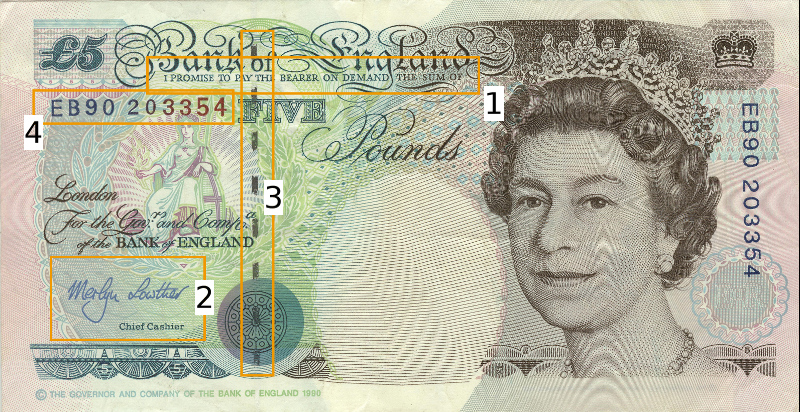
1) The Legal Agreement
For a long time, money was backed by physical gold or silver stored in a central bank. The British pound note, for example, represented a promise by the central bank to provide a certain amount of gold or silver in exchange for the note. This historical artifact is still represented by the following statement:
I promise to pay the bearer on demand the sum of five pounds.
The true value of the note comes from the fact that it physically represents a bearer right that is matched by an obligation on the issuer.
2) The Signature of the Counterparty
The value of a right described in a legal agreement is based on a matching obligation for a counterparty. The British pound note would be worthless if the central bank, as the issuer, did not recognize its obligation to provide a certain amount of gold or silver in exchange for the note. The chief cashier confirms this obligation by signing the note as a delegate for the Bank of England. In general, determining the parties that are involved in a contract is key to understanding its true value.
3) The Security Token
Another feature of the pound note is the security token embedded within the physical paper. It allows the note to be authenticated with limited effort by holding it against a light source. Even a third party can verify the note without requiring explicit confirmation from the issuer that it still acknowledges the associated obligations.
4) The Unique Identifier
Every note has a unique registration number that allows the issuer to track their obligations and detect duplicate bills. Once the issuer has fulfilled the obligations associated with a particular note, duplicates with the same identifier automatically become invalid.
5) The Distribution Mechanism
The note itself is printed on paper, and its legal owner is the person holding it. The physical form of the note allows the rights associated with it to be transferred to other parties that are not explicitly mentioned in the contract.
Run the application using prototyping tools
In this section, you will run the quickstart application and get introduced to the main tools for prototyping DAML:
To compile the DAML model, run
daml buildThis creates a DAR file (DAR is just the format that DAML compiles to) called
.daml/dist/quickstart-0.0.1.dar. The output should look like this:Created .daml/dist/quickstart-0.0.1.dar.
To run the sandbox (a lightweight local version of the ledger), run
daml sandbox .daml/dist/quickstart-0.0.1.darThe output should look like this:
INFO: Slf4jLogger started
INFO: Listening on localhost:6865 over plain text.
   ____             ____
  / __/__ ____  ___/ / /  ___ __ __
 _\ \/ _ `/ _ \/ _  / _ \/ _ \\ \ /
/___/\_,_/_//_/\_,_/_.__/\___/_\_\

INFO: Initialized sandbox version 1.6.0 with ledger-id = 3528b0dd-069b-420c-9df4-4af6b8fd4f47, port = 6865, dar file = List(.daml/dist/quickstart-0.0.1.dar), time mode = wall-clock time, ledger = in-memory, auth-service = AuthServiceWildcard$, contract ids seeding = strong
The sandbox is now running, and you can access its ledger API on port
6865.Open a new terminal window and navigate to your project directory,
quickstart.To initialize the ledger with some parties and contracts we use DAML Script by running
daml script --dar .daml/dist/quickstart-0.0.1.dar --script-name Main:initialize --ledger-host localhost --ledger-port 6865 --static-time
Try out the application
Now everything is running, you can try out the quickstart application:
Go to http://localhost:4000/. This is the Navigator, which you launched earlier.
On the login screen, select Alice from the dropdown. This logs you in as Alice.
(The list of available parties is specified in the
ui-backend.conffile.)This takes you to the contracts view:
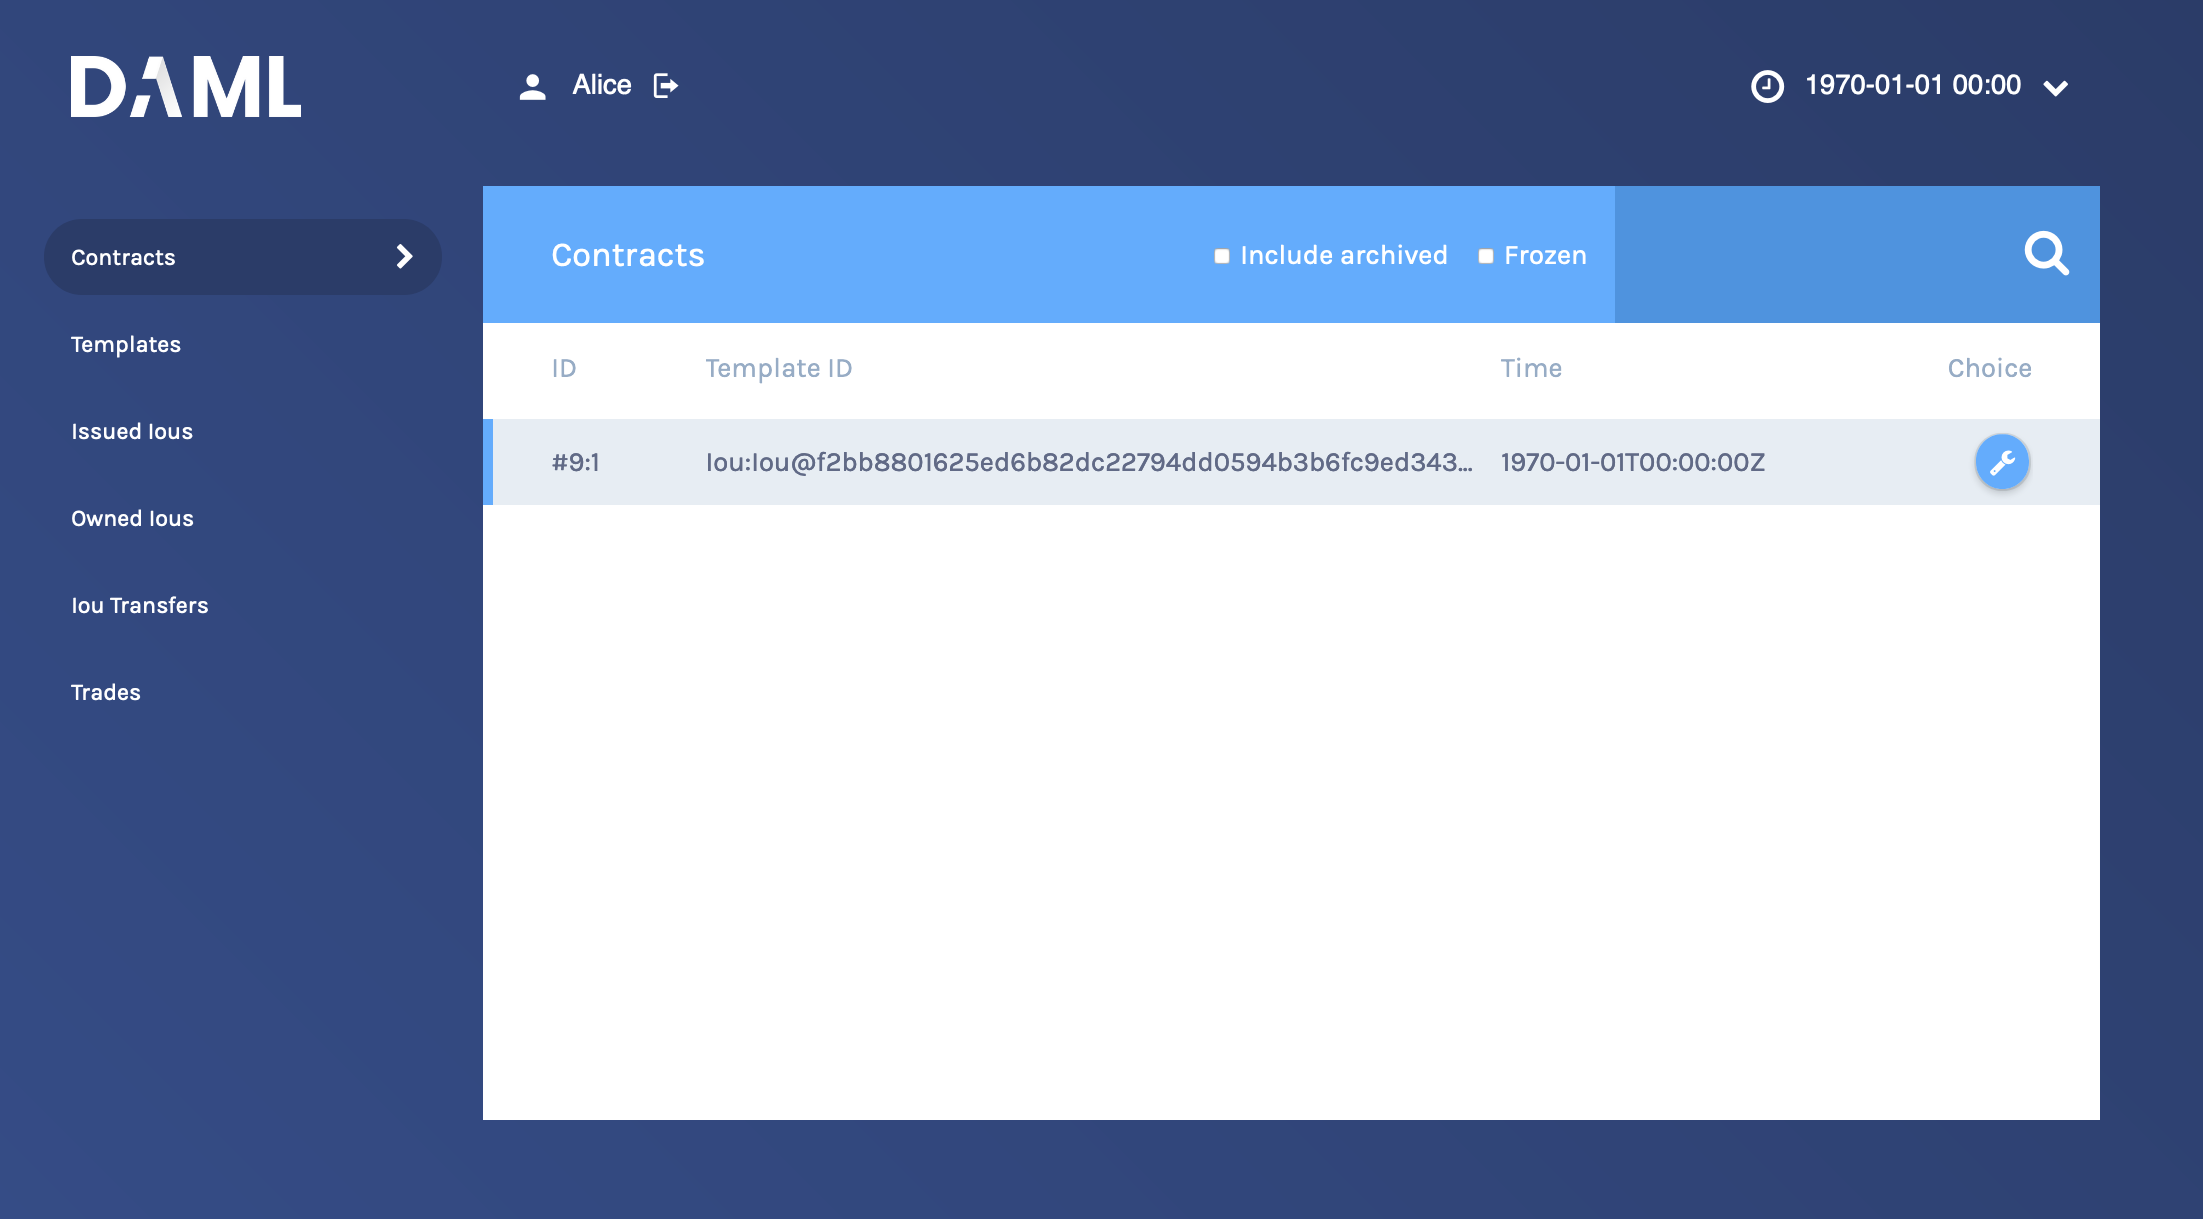
This is showing you what contracts are currently active on the sandbox ledger and visible to Alice. You can see that there is a single such contract, in our case with Id
#9:1, created from a template calledIou:Iou@ffb....Your contract ID may vary. There’s a lot going on in a DAML ledger, so things could have happened in a different order, or other internal ledger events might have occurred. The actual value doesn’t matter. We’ll refer to this contract as
#9:1in the rest of this document, and you’ll need to substitute your own value mentally.On the left-hand side, you can see what the pages the Navigator contains:
- Contracts
- Templates
- Issued Ious
- Owned Ious
- Iou Transfers
- Trades
Contracts and Templates are standard views, available in any application. The others are created just for this application, specified in the
frontend-config.jsfile.For information on creating custom Navigator views, see Customizable table views.
Click Templates to open the Templates page.
This displays all available contract templates. Instances of contracts (or just contracts) are created from these templates. The names of the templates are of the format module.template@hash. Including the hash disambiguates templates, even when identical module and template names are used between packages.
On the far right, you see the number of contracts that you can see for each template.
Try creating a contract from a template. Issue an Iou to yourself by clicking on the
Iou:Iourow, filling it out as shown below and clicking Submit.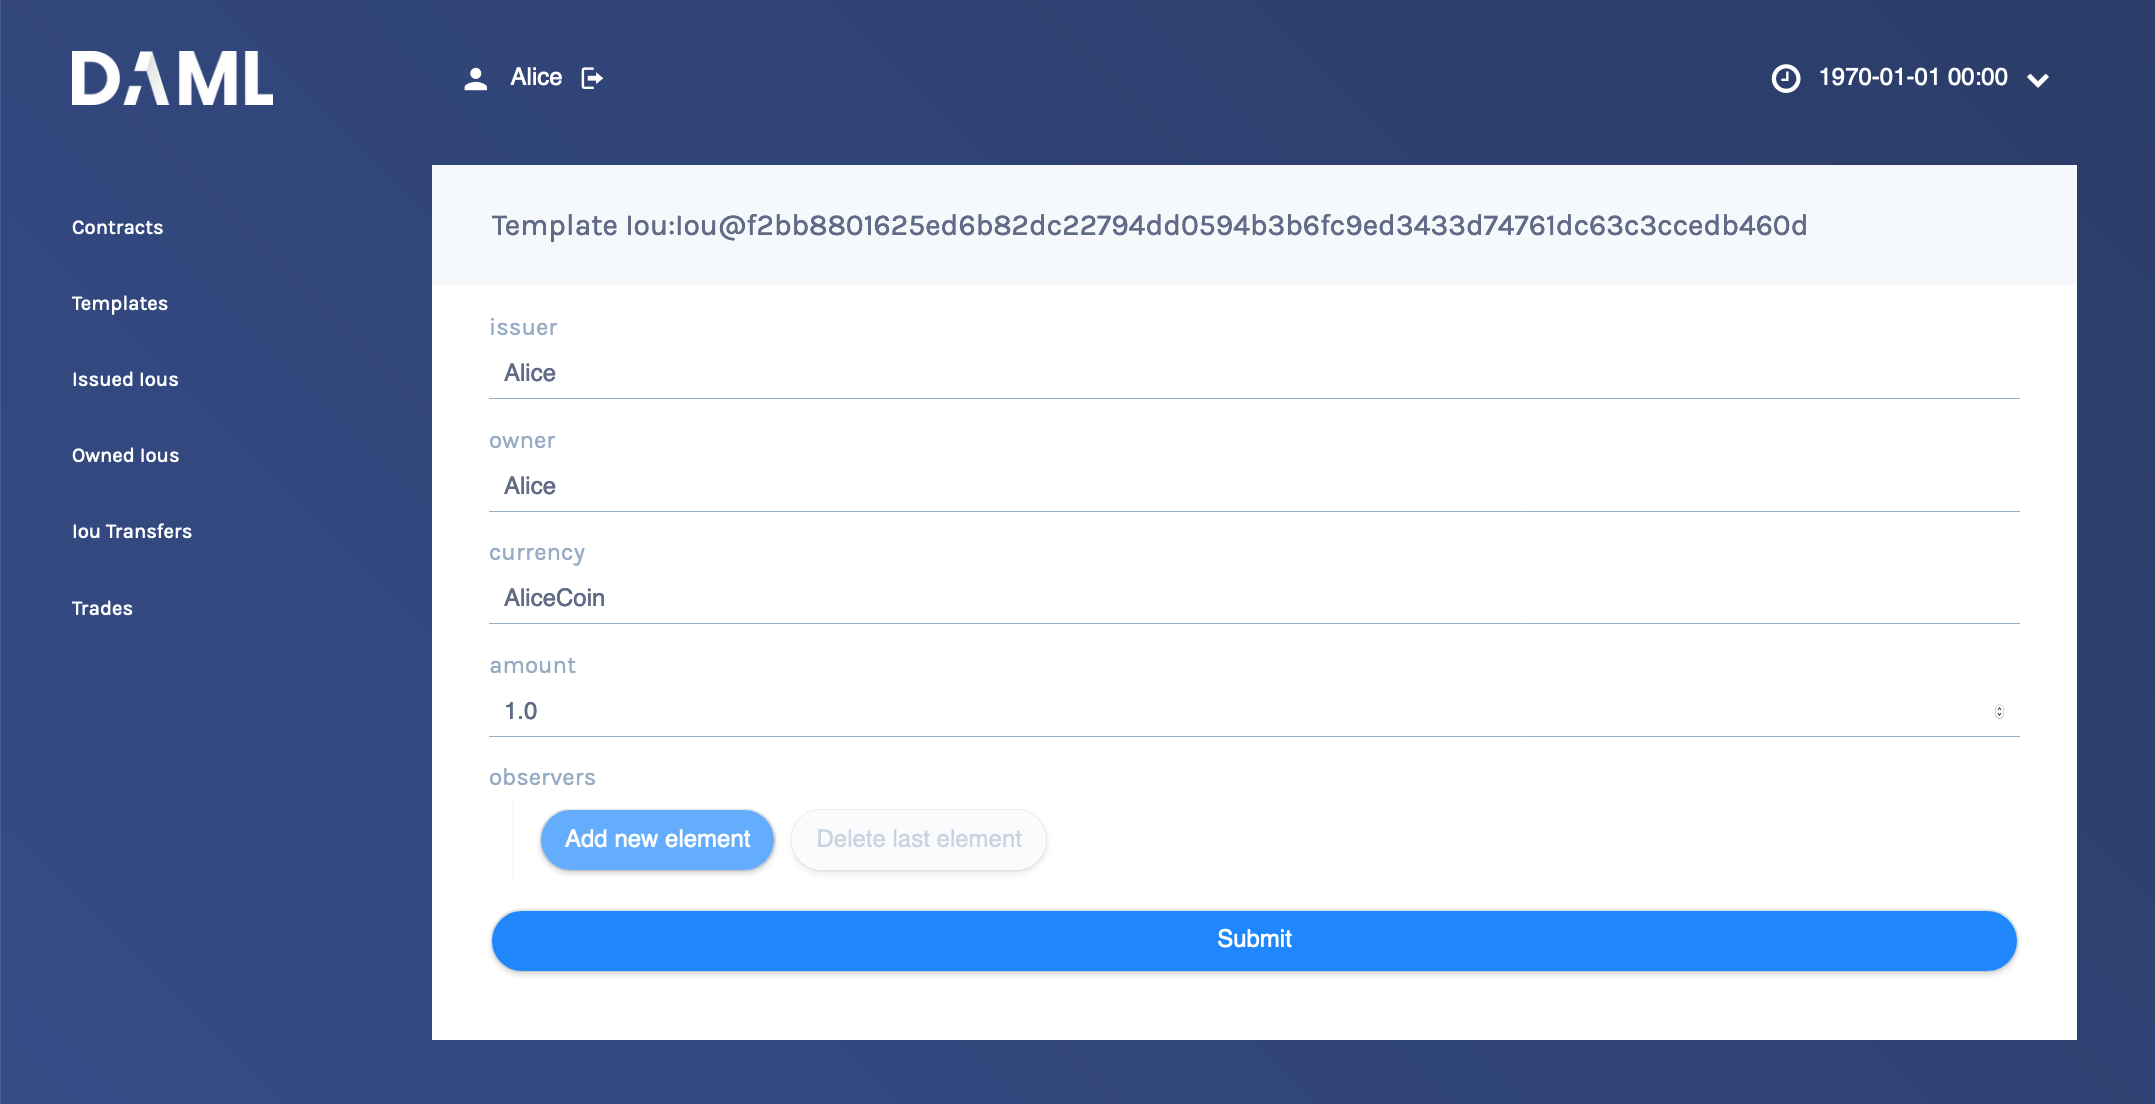
On the left-hand side, click Issued Ious to go to that page. You can see the Iou you just issued yourself.
Now, try transferring this Iou to someone else. Click on your Iou, select Iou_Transfer, enter Bob as the new owner and hit Submit.
Go to the Owned Ious page.
The screen shows the same contract
#9:1that you already saw on the Contracts page. It is an Iou for €100, issued by EUR_Bank.Go to the Iou Transfers page. It shows the transfer of your recently issued Iou to Bob, but Bob has not accepted the transfer, so it is not settled.
This is an important part of DAML: nobody can be forced into owning an Iou, or indeed agreeing to any other contract. They must explicitly consent.
You could cancel the transfer by using the IouTransfer_Cancel choice within it, but for this walk-through, leave it alone for the time being.
Try asking Bob to exchange your €100 for $110. To do so, you first have to show your Iou to Bob so that he can verify the settlement transaction, should he accept the proposal.
Go back to Owned Ious, open the Iou for €100 and click on the button Iou_AddObserver. Submit Bob as the newObserver.
Contracts in DAML are immutable, meaning they cannot be changed, only created and archived. If you head back to the Owned Ious screen, you can see that the Iou now has a new Contract ID. In our case, it’s #13:1.
To propose the trade, go to the Templates screen. Click on the IouTrade:IouTrade template, fill in the form as shown below and submit the transaction.
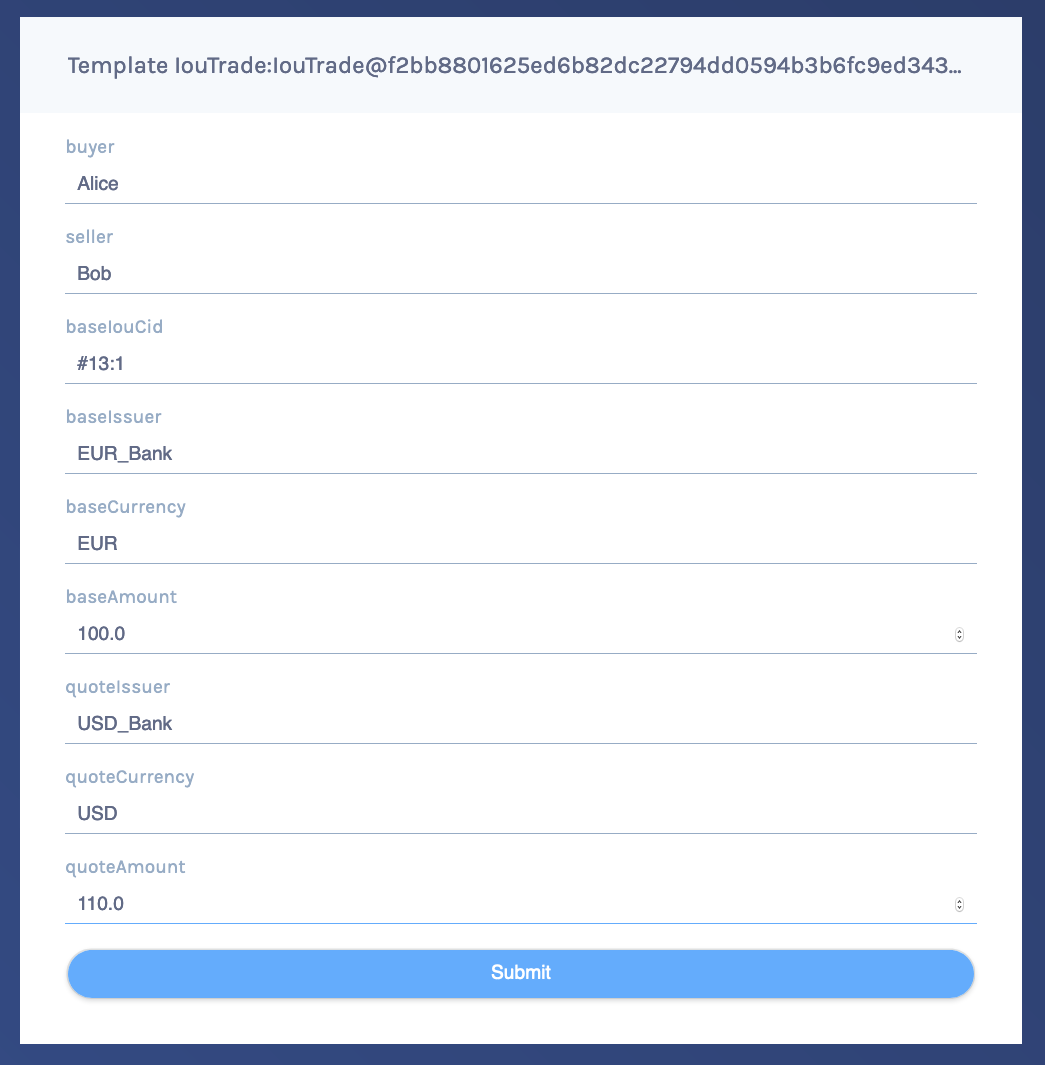
Go to the Trades page. It shows the just-proposed trade.
You are now going to switch user to Bob, so you can accept the trades you have just proposed. Start by clicking on the logout button next to the username, at the top of the screen. On the login page, select Bob from the dropdown.
First, accept the transfer of the AliceCoin. Go to the Iou Transfers page, click on the row of the transfer, and click IouTransfer_Accept, then Submit.
Go to the Owned Ious page. It now shows the AliceCoin.
It also shows an Iou for $110 issued by USD_Bank. This matches the trade proposal you made earlier as Alice.
Note its Contract Id.
Settle the trade. Go to the Trades page, and click on the row of the proposal. Accept the trade by clicking IouTrade_Accept. In the popup, enter the Contract ID you just noted as the quoteIouCid, then click Submit.
The two legs of the transfer are now settled atomically in a single transaction. The trade either fails or succeeds as a whole.
Privacy is an important feature of DAML. You can check that Alice and Bob’s privacy relative to the Banks was preserved.
To do this, log out, then log in as USD_Bank.
On the Contracts page, select Include archived. The page now shows all the contracts that USD_Bank has ever known about.
There are just five contracts:
- Three contracts created on startup:
- A self-issued Iou for $110.
- The IouTransfer to transfer that Iou to Bob
- The resulting Iou owned by Bob.
- The transfer of Bob’s Iou to Alice that happened as part of the trade. Note that this is a transient contract that got archived in the same transaction it got created in.
- The new $110 Iou owned by Alice. This is the only active contract.
USD_Bank does not know anything about the trade or the EUR-leg. For more information on privacy, refer to the DAML Ledger Model.
Note
USD_Bank does know about an intermediate IouTransfer contract that was created and consumed as part of the atomic settlement in the previous step. Since that contract was never active on the ledger, it is not shown in Navigator. You will see how to view a complete transaction graph, including who knows what, in Test using scenarios below.
- Three contracts created on startup:
Get started with DAML
The contract model specifies the possible contracts, as well as the allowed transactions on the ledger, and is written in DAML.
The core concept in DAML is a contract template - you used them earlier to create contracts. Contract templates specify:
- a type of contract that may exist on the ledger, including a corresponding data type
- the signatories, who need to agree to the creation of a contract of that type
- the rights or choices given to parties by a contract of that type
- constraints or conditions on the data on a contract
- additional parties, called observers, who can see the contract
For more information about DAML Ledgers, consult DAML Ledger Model for an in-depth technical description.
Develop with DAML Studio
Take a look at the DAML that specifies the contract model in the quickstart application. The core template is Iou.
- Open DAML Studio, a DAML IDE based on VS Code, by running
daml studiofrom the root of your project. - Using the explorer on the left, open
daml/Iou.daml.
The first two lines specify language version and module name:
module Iou where
Next, a template called Iou is declared together with its datatype. This template has five fields:
template Iou
  with
    issuer : Party
    owner : Party
    currency : Text
    amount : Decimal
    observers : [Party]
Conditions for the creation of a contract are specified using the ensure and signatory keywords:
    ensure amount > 0.0

    signatory issuer, owner
In this case, there are two conditions:
- An
Ioucan only be created if it is authorized by bothissuerandowner. - The
amountneeds to be positive.
Earlier, as Alice, you authorized the creation of an Iou. The amount was 100.0, and Alice as both issuer and owner, so both conditions were satisfied, and you could successfully create the contract.
To see this in action, go back to the Navigator and try to create the same Iou again, but with Bob as owner. It will not work.
Observers are specified using the observer keyword:
observer observers
Next, rights or choices are given to owner:
    controller owner can
      Iou_Transfer : ContractId IouTransfer
        with
          newOwner : Party
        do create IouTransfer with iou = this; newOwner
controller owner can starts the block. In this case, owner has the right to:
- split the Iou
- merge it with another one differing only on
amount - initiate a transfer
- add and remove observers
The Iou_Transfer choice above takes a parameter called newOwner and creates a new IouTransfer contract and returns its ContractId. It is important to know that, by default, choices consume the contract on which they are exercised. Consuming, or archiving, makes the contract no longer active. So the IouTransfer replaces the Iou.
A more interesting choice is IouTrade_Accept. To look at it, open IouTrade.daml.
    controller seller can
      IouTrade_Accept : (IouCid, IouCid)
        with
          quoteIouCid : IouCid
        do
          baseIou <- fetch baseIouCid
          baseIssuer === baseIou.issuer
          baseCurrency === baseIou.currency
          baseAmount === baseIou.amount
          buyer === baseIou.owner
          quoteIou <- fetch quoteIouCid
          quoteIssuer === quoteIou.issuer
          quoteCurrency === quoteIou.currency
          quoteAmount === quoteIou.amount
          seller === quoteIou.owner
          quoteIouTransferCid <- exercise quoteIouCid Iou_Transfer with
            newOwner = buyer
          transferredQuoteIouCid <- exercise quoteIouTransferCid IouTransfer_Accept
          baseIouTransferCid <- exercise baseIouCid Iou_Transfer with
            newOwner = seller
          transferredBaseIouCid <- exercise baseIouTransferCid IouTransfer_Accept
          return (transferredQuoteIouCid, transferredBaseIouCid)
This choice uses the === operator from the DAML Standard Library to check pre-conditions. The standard library is imported using import DA.Assert at the top of the module.
Then, it composes the Iou_Transfer and IouTransfer_Accept choices to build one big transaction. In this transaction, buyer and seller exchange their Ious atomically, without disclosing the entire transaction to all parties involved.
The Issuers of the two Ious, which are involved in the transaction because they are signatories on the Iou and IouTransfer contracts, only get to see the sub-transactions that concern them, as we saw earlier.
For a deeper introduction to DAML, consult the DAML Reference.
Test using scenarios
You can check the correct authorization and privacy of a contract model using scenarios: tests that are written in DAML.
Scenarios are a linear sequence of transactions that is evaluated using the same consistency, conformance and authorization rules as it would be on the full ledger server or the sandbox ledger. They are integrated into DAML Studio, which can show you the resulting transaction graph, making them a powerful tool to test and troubleshoot the contract model.
To take a look at the scenarios in the quickstart application, open daml/Tests/Trade.daml in DAML Studio.
A scenario test is defined with trade_test = scenario do. The submit function takes a submitting party and a transaction, which is specified the same way as in contract choices.
The following block, for example, issues an Iou and transfers it to Alice:
  -- Banks issue IOU transfers.
  iouTransferAliceCid <- submit eurBank do
    createAndExerciseCmd
      Iou with
        issuer = eurBank
        owner = eurBank
        currency = "EUR"
        amount = 100.0
Compare the scenario with the setup scenario in daml/Main.daml. You will see that the scenario you used to initialize the sandbox is an initial segment of the trade_test scenario. The latter adds transactions to perform the trade you performed through Navigator, and a couple of transactions in which expectations are verified.
After a short time, the text Scenario results should appear above the test. Click on it to open the visualization of the resulting ledger state.
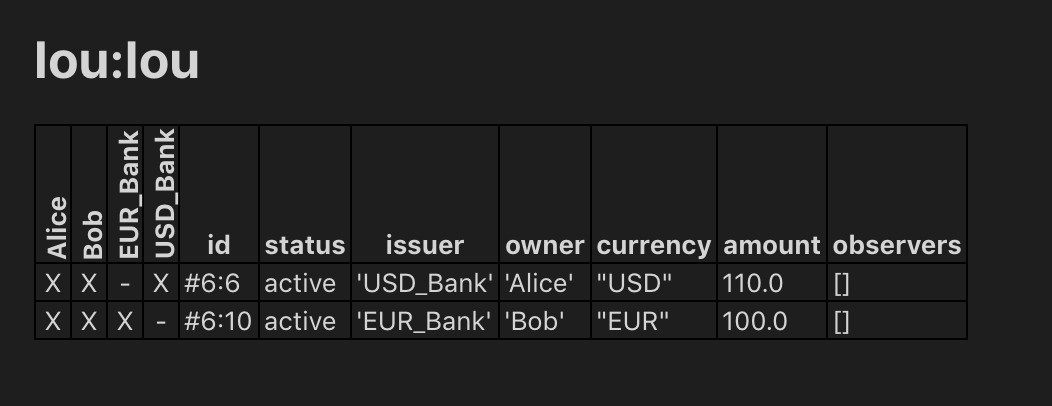
Each row shows a contract on the ledger. The first four columns show which parties know of which contracts. The remaining columns show the data on the contracts. You can see past contracts by checking the Show archived box at the top. Click the adjacent Show transaction view button to switch to a view of the entire transaction tree.
In the transaction view, transaction #6 is of particular interest, as it shows how the Ious are exchanged atomically in one transaction. The lines starting known to (since) show that the Banks do indeed not know anything they should not:
TX #6 1970-01-01T00:00:00Z (Tests.Trade:61:14)
#6:0
│   known to (since): 'Alice' (#6), 'Bob' (#6)
└─> 'Bob' exercises IouTrade_Accept on #5:0 (IouTrade:IouTrade)
          with
            quoteIouCid = #3:1
    children:
    #6:1
    │   known to (since): 'Alice' (#6), 'Bob' (#6)
    └─> fetch #4:1 (Iou:Iou)

    #6:2
    │   known to (since): 'Alice' (#6), 'Bob' (#6)
    └─> fetch #3:1 (Iou:Iou)

    #6:3
    │   known to (since): 'Bob' (#6), 'USD_Bank' (#6), 'Alice' (#6)
    └─> 'Bob' exercises Iou_Transfer on #3:1 (Iou:Iou)
              with
                newOwner = 'Alice'
        children:
        #6:4
        │   consumed by: #6:5
        │   referenced by #6:5
        │   known to (since): 'Bob' (#6), 'USD_Bank' (#6), 'Alice' (#6)
        └─> create Iou:IouTransfer
            with
              iou =
                (Iou:Iou with
                   issuer = 'USD_Bank';
                   owner = 'Bob';
                   currency = "USD";
                   amount = 110.0;
                   observers = []);
              newOwner = 'Alice'

    #6:5
    │   known to (since): 'Bob' (#6), 'USD_Bank' (#6), 'Alice' (#6)
    └─> 'Alice' exercises IouTransfer_Accept on #6:4 (Iou:IouTransfer)
                with
        children:
        #6:6
        │   referenced by #7:0
        │   known to (since): 'Alice' (#6), 'USD_Bank' (#6), 'Bob' (#6)
        └─> create Iou:Iou
            with
              issuer = 'USD_Bank';
              owner = 'Alice';
              currency = "USD";
              amount = 110.0;
              observers = []

    #6:7
    │   known to (since): 'Alice' (#6), 'EUR_Bank' (#6), 'Bob' (#6)
    └─> 'Alice' exercises Iou_Transfer on #4:1 (Iou:Iou)
                with
                  newOwner = 'Bob'
        children:
        #6:8
        │   consumed by: #6:9
        │   referenced by #6:9
        │   known to (since): 'Alice' (#6), 'EUR_Bank' (#6), 'Bob' (#6)
        └─> create Iou:IouTransfer
            with
              iou =
                (Iou:Iou with
                   issuer = 'EUR_Bank';
                   owner = 'Alice';
                   currency = "EUR";
                   amount = 100.0;
                   observers = ['Bob']);
              newOwner = 'Bob'

    #6:9
    │   known to (since): 'Alice' (#6), 'EUR_Bank' (#6), 'Bob' (#6)
    └─> 'Bob' exercises IouTransfer_Accept on #6:8 (Iou:IouTransfer)
              with
        children:
        #6:10
        │   referenced by #8:0
        │   known to (since): 'Bob' (#6), 'EUR_Bank' (#6), 'Alice' (#6)
        └─> create Iou:Iou
            with
              issuer = 'EUR_Bank'; owner = 'Bob'; currency = "EUR"; amount = 100.0; observers = []
The submit function used in this scenario tries to perform a transaction and fails if any of the ledger integrity rules are violated. There is also a submitMustFail function, which checks that certain transactions are not possible. This is used in daml/Tests/Iou.daml, for example, to confirm that the ledger model prevents double spends.
Integrate with the ledger
A distributed ledger only forms the core of a full DAML application.
To build automations and integrations around the ledger, DAML Connect has language bindings for the Ledger API in several programming languages.
To compile the Java integration for the quickstart application, we first need to run the Java codegen on the DAR we built before:
daml codegen java
Once the code has been generated, we can now compile it using mvn compile.
Now start the Java integration with mvn exec:java@run-quickstart. Note that
this step requires that the sandbox started earlier is running.
The application provides REST services on port 8080 to perform basic operations on behalf on Alice.
Note
To start the same application on another port, use the command-line parameter -Drestport=PORT. To start it for another party, use -Dparty=PARTY.
For example, to start the application for Bob on 8081, run mvn exec:java@run-quickstart -Drestport=8081 -Dparty=Bob
The following REST services are included:
GETonhttp://localhost:8080/ioulists all active Ious, and their Ids.Note that the Ids exposed by the REST API are not the ledger contract Ids, but integers. You can open the address in your browser or run
curl -X GET http://localhost:8080/iou.GETonhttp://localhost:8080/iou/IDreturns the Iou with IdID.For example, to get the content of the Iou with Id 0, run:
curl -X GET http://localhost:8080/iou/0PUTonhttp://localhost:8080/ioucreates a new Iou on the ledger.To create another AliceCoin, run:
curl -X PUT -d '{"issuer":"Alice","owner":"Alice","currency":"AliceCoin","amount":1.0,"observers":[]}' http://localhost:8080/iouPOSTonhttp://localhost:8080/iou/ID/transfertransfers the Iou with IdID.Check the Id of your new AliceCoin by listing all active Ious. If you have followed this guide, it will be
0so you can run:curl -X POST -d '{ "newOwner":"Bob" }' http://localhost:8080/iou/0/transferto transfer it to Bob. If it’s not
0, just replace the0iniou/0in the above command.
The automation is based on the Java bindings and the output of the Java code generator, which are included as a Maven dependency and Maven plugin respectively:
        <dependency>
            <groupId>com.daml</groupId>
            <artifactId>bindings-rxjava</artifactId>
            <version>__VERSION__</version>
            <exclusions>
                <exclusion>
                    <groupId>com.google.protobuf</groupId>
                    <artifactId>protobuf-lite</artifactId>
                </exclusion>
            </exclusions>
        </dependency>
It consists of the application in file IouMain.java. It uses the class Iou from Iou.java, which is generated from the DAML model with the Java code generator. The Iou class provides better serialization and de-serialization to JSON via gson.
A connection to the ledger is established using a
LedgerClientobject.// Create a client object to access services on the ledger. DamlLedgerClient client = DamlLedgerClient.forHostWithLedgerIdDiscovery(ledgerhost, ledgerport, Optional.empty()); // Connects to the ledger and runs initial validation. client.connect();
An in-memory contract store is initialized. This is intended to provide a live view of all active contracts, with mappings between ledger and external Ids.
AtomicLong idCounter = new AtomicLong(0);
ConcurrentHashMap<Long, Iou> contracts = new ConcurrentHashMap<>();
BiMap<Long, Iou.ContractId> idMap = Maps.synchronizedBiMap(HashBiMap.create());
The Active Contracts Service (ACS) is used to quickly build up the contract store to a recent state.
client.getActiveContractSetClient().getActiveContracts(iouFilter, true)
        .blockingForEach(response -> {
            response.getOffset().ifPresent(offset -> acsOffset.set(new LedgerOffset.Absolute(offset)));
            response.getCreatedEvents().stream()
                    .map(Iou.Contract::fromCreatedEvent)
                    .forEach(contract -> {
                        long id = idCounter.getAndIncrement();
                        contracts.put(id, contract.data);
                        idMap.put(id, contract.id);
                    });
        });
Note the use of
blockingForEachto ensure that the contract store is fully built and the ledger-offset up to which the ACS provides data is known before moving on.The Transaction Service is wired up to update the contract store on occurrences of
ArchiveEventandCreateEventfor Ious. SincegetTransactionsis called without end offset, it will stream transactions indefinitely, until the application is terminated.Disposable ignore = client.getTransactionsClient().getTransactions(acsOffset.get(), iouFilter, true) .forEach(t -> { for (Event event : t.getEvents()) { if (event instanceof CreatedEvent) { CreatedEvent createdEvent = (CreatedEvent) event; long id = idCounter.getAndIncrement(); Iou.Contract contract = Iou.Contract.fromCreatedEvent(createdEvent); contracts.put(id, contract.data); idMap.put(id, contract.id); } else if (event instanceof ArchivedEvent) { ArchivedEvent archivedEvent = (ArchivedEvent) event; long id = idMap.inverse().get(new Iou.ContractId(archivedEvent.getContractId())); contracts.remove(id); idMap.remove(id); } } });
Commands are submitted via the Command Submission Service.
private static Empty submit(LedgerClient client, String party, Command c) {
    return client.getCommandSubmissionClient().submit(
            UUID.randomUUID().toString(),
            "IouApp",
            UUID.randomUUID().toString(),
            party,
            Optional.empty(),
            Optional.empty(),
            Optional.empty(),
            Collections.singletonList(c))
            .blockingGet();
}
You can find examples of
ExerciseCommandandCreateCommandinstantiation in the bodies of thetransferandiouendpoints, respectively.ExerciseCommand¶Iou.ContractId contractId = idMap.get(Long.parseLong(req.params("id"))); ExerciseCommand exerciseCommand = contractId.exerciseIou_Transfer(m.get("newOwner").toString());
CreateCommand¶Iou iou = g.fromJson(req.body(), Iou.class); CreateCommand iouCreate = iou.create();
The rest of the application sets up the REST services using Spark Java, and does dynamic package Id detection using the Package Service. The latter is useful during development when package Ids change frequently.
For a discussion of ledger application design and architecture, take a look at Application Architecture Guide.
Next steps
Great - you’ve completed the quickstart guide!
Some steps you could take next include:
- Explore examples for guidance and inspiration.
- Learn DAML.
- Language reference.
- Learn more about application development.
- Learn about the conceptual models behind DAML.

