
Transfer
This tutorial introduces the core asset model of the library through a simple example. The purpose is to illustrate the concepts of account, instrument, and holding, as well as showing how to work with Daml interfaces.
We are going to:
- create accounts for Alice and Bob at the Bank
- issue a cash instrument
- credit a cash holding to Alice’s account
- transfer the holding from Alice to Bob
We expect the reader to be familiar with the basic building blocks of Daml. If that is not the case, a suitable introduction can be found here. In particular, An Introduction to Daml would be a good starting point.
Download the Code for the Tutorial
As a prerequisite, the Daml SDK needs to be installed on your machine.
Open a terminal and run:
daml new quickstart-finance --template quickstart-finance
This creates a new folder with contents from our template. Navigate to the folder and then run the
following to download the required daml-finance packages:
./get-dependencies.sh
Then run the following to open the code editor and inspect the code:
daml studio
Structure of the Code and Dependencies
The code includes
- four workflows defined in the
Workflowsfolder - three Daml scripts defined in the
Scriptsfolder
The Workflows encapsulate the core business logic of the application, whereas the Scripts
are meant to be executed on a one-off basis.
If you take a closer look at the Workflows, you will recognize three initiate / accept patterns
to:
- create an account
- make a deposit to the account
- execute a holding transfer
The DvP workflow will be used in the next tutorial, so please ignore that one for now.
Modules in the Workflows folder depend only on interface packages of daml-finance (the
packages that start with Daml.Finance.Interface.*), as you can see from the import list.
This is important, as it decouples the user-defined business logic from the template implementations
used in daml-finance which makes it easier to upgrade the application. The user-defined business
logic in the Workflows will not need to be modified nor re-compiled to work with
upgraded (ie., newer versions of) implementation packages.
On the other hand, modules in the Scripts folder depend on both the interface packages and
the implementation packages (in this case, Daml.Finance.Account, Daml.Finance.Holding,
and Daml.Finance.Instrument.Token). This is not problematic as scripts are meant to be run only
once when the application is initialized.
Run the Transfer Script
Let us now explore the Transfer script step-by-step.
Create Holding and Account Factories
The first instruction instantiates an account factory. This is just a template that is used by a
party (the Bank in this case) to create accounts as part of the CreateAccount workflow.
  accountFactoryCid <- toInterfaceContractId @Account.F <$> submit bank do
    createCmd Account.Factory with provider = bank; observers = empty
Notice how the ContractId is immediately converted to an interface upon creation: this is
because our workflows do not have any knowledge of concrete template implementations.
Similarly, we define a holding factory, which is used within an account to Credit and Debit
holdings.
  holdingFactoryCid <- toInterfaceContractId @Holding.F <$> submit bank do
    createCmd Fungible.Factory with
      provider = bank
      observers = fromList [("PublicObserver", singleton public )]
This factory contract can be used to create Fungible holdings, which are defined in Daml.Finance.Holding.Fungible and are both fungible, as well as transferable.
We are adding a so-called public party as an observer to the holding factory. This is done to ensure that every other party has visibility over this contract, as all parties can readAs the public party. The reason why this is necessary will be shown at the end of this tutorial.
Open Alice’s and Bob’s Accounts
Once the factory templates are setup, we leverage our CreateAccount workflow to create accounts
at the Bank for Alice and Bob.
The creation of an account needs to be authorized by both the custodian and the owner, i.e.,
by the Bank and Alice in our case. Authorization is collected using an initiate / accept pattern.
  aliceRequestCid <- submit alice do
    createCmd CreateAccount.Request with owner = alice; custodian = bank
  aliceAccount <- submit bank do
    exerciseCmd aliceRequestCid CreateAccount.Accept with
      label = "Alice@Bank"
      description = "Account of Alice at Bank"
      accountFactoryCid = accountFactoryCid
      holdingFactoryCid = holdingFactoryCid
      observers = []
Bob’s account is created in a similar fashion.
Create the Cash Instrument
In order to credit Alice’s account with some cash, we first introduce a cash Instrument in our model.
  let
    instrumentId = Id "USD"
    instrumentVersion = "0"
  now <- getTime

  cashInstrumentCid <- toInterfaceContractId @Instrument.I <$> submit bank do
    createCmd Instrument with
      depository = bank
      issuer = bank
      id = instrumentId
      version = instrumentVersion
      description = "Instrument representing units of USD"
      validAsOf = now
      observers = empty
An instrument is a representation of what it is that we are holding against the bank. It can be as simple as just a textual label (like in this case) or it can include complex on-ledger lifecycling logic.
To hold one unit of the cash instrument in this scenario means that we can claim USD 1 from the custodian of the holding.
Notice how in this case the Bank acts both as the issuer and depository of the cash instrument. This means that we fully trust the Bank with any action concerning the instrument.
Deposit Cash in Alice’s Account
We can now deposit cash in Alice’s account, using the CreditAccount workflow.
  aliceRequestCid <- submit alice do
    createCmd CreditAccount.Request with
      account = aliceAccount
      instrument = InstrumentKey with
        issuer = bank
        depository = bank
        id = instrumentId
        version = instrumentVersion
      amount = 1000.0

  aliceCashHoldingCid <- submit bank do exerciseCmd aliceRequestCid CreditAccount.Accept
Alice creates a request to deposit USD 1000 at the Bank, the Bank then accepts the request and
a corresponding
Holding is created.
You can imagine that the latter step happens only after Alice has shown up at the bank and delivered physical banknotes corresponding to the amount of the deposit.
Transfer Cash from Alice to Bob
The final step of our Setup script transfers Alice’s holding to Bob using the Transfer
workflow. In our tutorial example, the receiver of the cash makes the transfer request:
  let
    cashInstrument = InstrumentKey with
      issuer = bank
      depository = bank
      id = instrumentId
      version = instrumentVersion

  transferRequestCid <- submit bob do
    createCmd Transfer.Request with
      receiverAccount = bobAccount
      instrument = cashInstrument
      amount = 1000.0
      currentOwner = alice

  newHoldingCid <- submitMulti [alice] [public] do
    exerciseCmd transferRequestCid Transfer.Accept with holdingCid = aliceCashHoldingCid
Bob requests the cash to be transferred to his account. Alice then accepts the request.
You notice that here we make explicit use of the fact that Alice can readAs the public party.
This is needed as, in order to complete the transfer, visibility on the receiving account’s holding
factory is required.
Frequently Asked Questions
How does the Transfer workflow work?
If you look at the implementation of the Transfer workflow, you will notice the following lines:
        let transferableCid = coerceInterfaceContractId @Transferable.I holdingCid

        newTransferableCid <- exercise transferableCid Transferable.Transfer with
          actors = fromList [currentOwner, receiverAccount.owner]
          newOwnerAccount = receiverAccount

        pure $ toInterfaceContractId @Holding.I newTransferableCid
The first line converts the holding contract id (of type
ContractId Holding.I) to the
Transferable.I
interface using coerceInterfaceContractId.
Then, the Transfer choice, defined as part of the
Transferable
interface, is invoked.
Finally, the new holding is converted back to a
Holding.I
before it is returned. This is done using toInterfaceContractId.
In order to fully understand these instructions, we need to keep in mind the interface hierarchy used by our holding implementation.
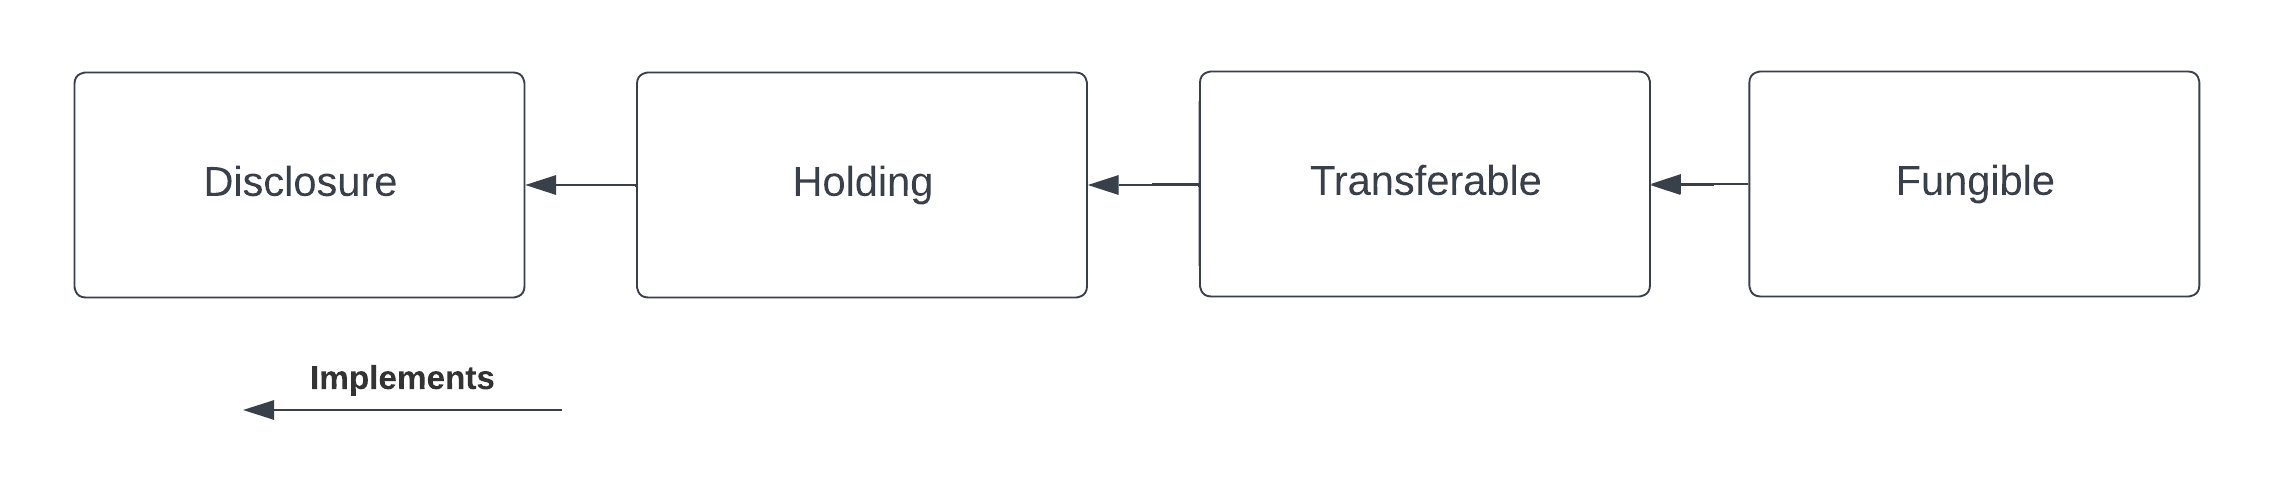
We use coerceInterfaceContractId to convert the
Holding.I
to a
Transferable.
The success of this
operation is not guaranteed and will result in a run-time error if the holding implementation at
hand does not implement
Transferable.
We use toInterfaceContractId to convert back to a
Holding.
This is because all
Transferables
implement the
Holding.I interface,
so the validity of this operation is
guaranteed at compile-time.
Why is Alice an observer on Bob’s account?
You might have noticed that Alice is an observer of Bob’s account and you might be wondering why this is the case.
This is because the party exercising the Transfer choice, which in this case is Alice, needs to
fetch Bob’s account in order to verify that it has not been archived.
If we wanted to avoid Bob’s account contract ever being disclosed to Alice, we would need a third
party (in this case the Bank) to execute the Transfer.
What are accounts used for?
An account is used as the proof of a business relationship between an owner and a custodian: Alice may transfer cash to Bob because Bob has a valid account at the Bank.
This is done to avoid that Alice transfers cash to Charlie without Charlie being vetted and acknowledged by the Bank.
The account is also used to determine who actually authorizes incoming and outgoing transfers. For the account at hand, the owner acts as a controller for both incoming and outgoing transfers. For an other account, you could for example let the custodian be the controller instead.
Why do we need factories?
You might be wondering why we use account factories and holding factories instead of creating an Account or Holding directly.
This is done to avoid having to reference Daml.Finance.Holding directly in user workflows (and
hence simplify upgrading procedures).
This is based on the assumption that there are very few factory contracts which are setup on ledger initialization.
Exercises
There are a couple of improvements to the code that can be implemented as an exercise. They will help you familiarize yourself with the library and with Daml interfaces.
Split the Holding to Transfer the Right Amount
In the example, Bob requests USD 1000 from Alice and Alice allocates a holding for exactly the
right amount, because the transfer would otherwise fail. We want the transfer to be successful also
if Alice allocates a holding for a larger amount e.g., USD 1500.
We can leverage the fact that the holding implements the
Fungible
interface, which makes it possible to Split it into a holding of USD 1000 and one of
USD 500. In the implementation of the CashTransferRequest_Accept choice:
- cast the allocated holding to the Fungible interface
- use the
Splitchoice to split the larger holding into two holdings - execute the transfer, allocating the holding with the correct amount
In the last step, you will need to cast the
Fungible to a
Transferable
using toInterfaceContractId.
Temporary Account Disclosure
There is no reason for Alice to be an observer on Bob’s account before the transfer is initiated by Bob (and after the transfer is executed).
Modify the original code, such that:
- Bob’s account is disclosed to Alice once the transfer is initiated
- When the Transfer is executed, Alice removes herself from the account observers
In order to do that, you can leverage the fact that
Account
implements the
Disclosure
interface. This interface exposes the AddObservers and RemoveObservers choices, which can be
used to disclose / undisclose Bob’s account contract to Alice. In order to exercise these choices,
you can use the Account.exerciseInterfaceByKey utility function.
Summary
You know how to setup basic accounts, holdings and instruments. You also learned how to perform a simple transfer. The key concepts to take away are:
- Holdings represent the ownership of a financial instrument at a custodian.
- Instruments define the economic terms of a financial contract.
- Accounts ensure that only known parties can obtain ownership.
- Factories are used to create the respective contracts without having to depend on implementation packages.
- Transfers change ownership of a holding.
Ownership transfers typically happen as part of a larger financial transaction. The next tutorial will show you how to create such a transaction and how to settle it atomically.