Write: Daml Studio
Daml Studio is an integrated development environment (IDE) for Daml. It is an extension on top of Visual Studio Code (VS Code), a cross-platform, open-source editor providing a rich code editing experience.
Install
Daml Studio is included in the Daml SDK.
Create Your First Daml File
Start Daml Studio by running
daml studioin the current project.This command starts Visual Studio Code and (if needs be) installs the Daml Studio extension, or upgrades it to the latest version.
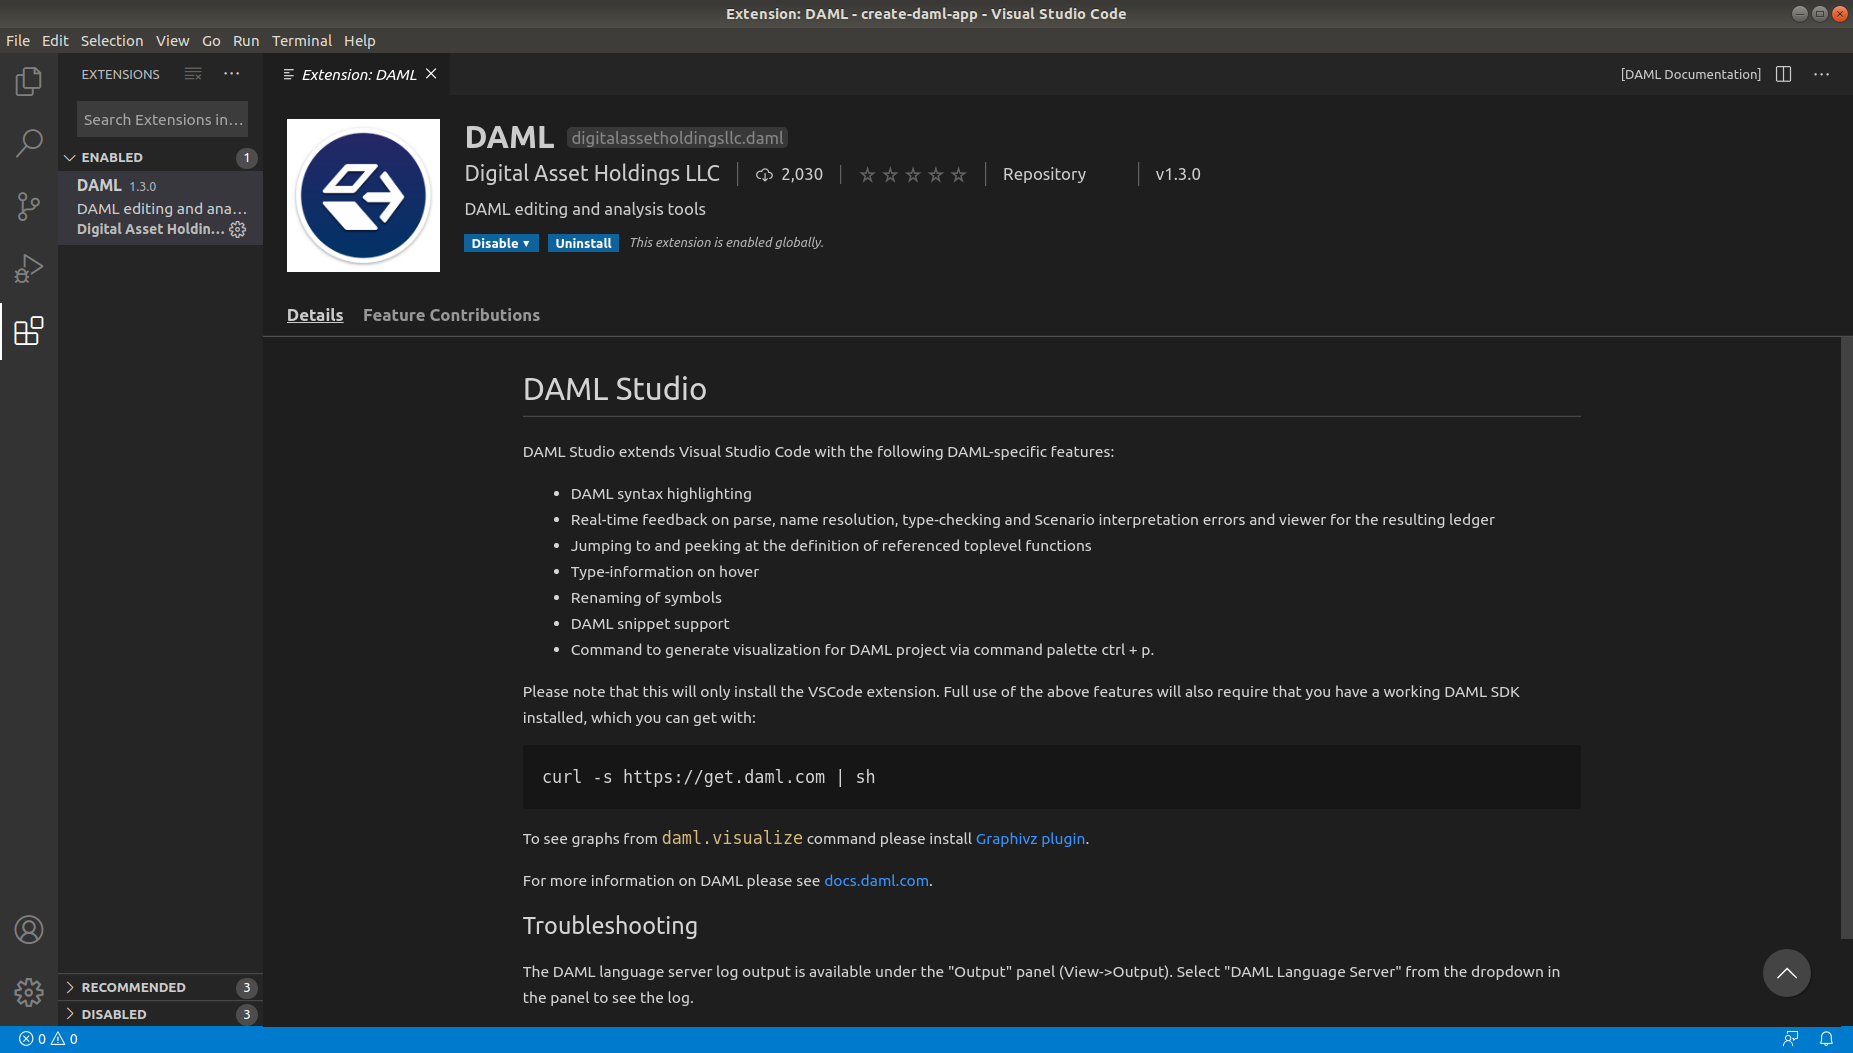
Make sure the Daml Studio extension is installed:
- Click on the Extensions icon at the bottom of the VS Code sidebar.
- Click on the Daml Studio extension that should be listed on the pane.
Open a new file (
⌘N) and save it (⌘S) asTest.daml.Copy the following code into your file:
module Test where

double : Int -> Int
double x = 2 * x
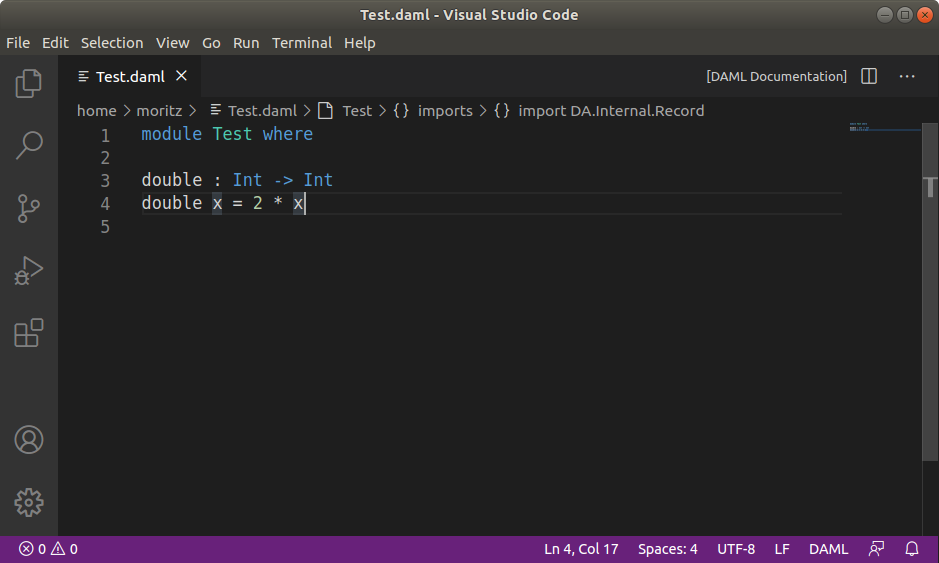
Your screen should now look like the image below.
Introduce a parse error by deleting the
=sign and then clicking the Ⓧ symbol on the lower-left corner. Your screen should now look like the image below.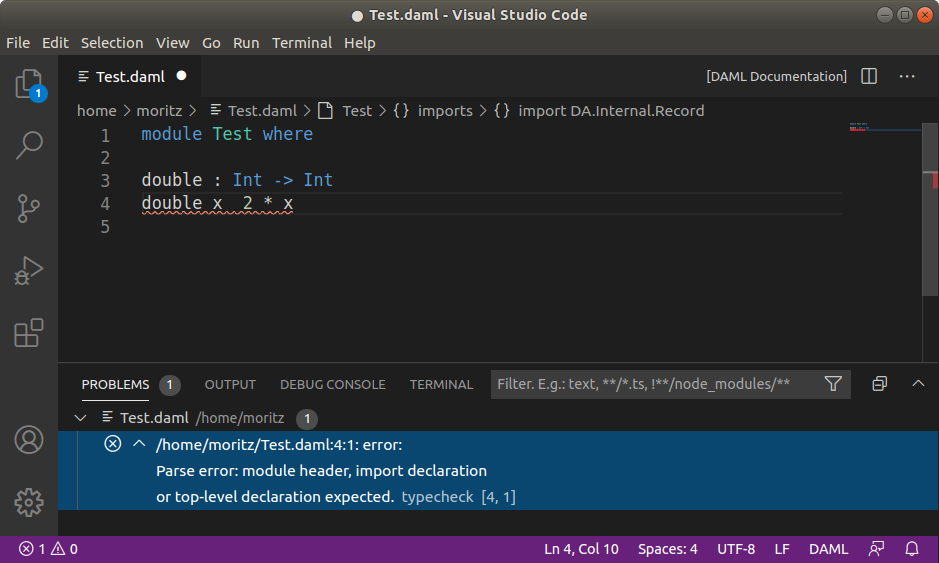
Remove the parse error by restoring the
=sign.
We recommend reviewing the Visual Studio Code documentation to learn more about how to use it. To learn more about Daml, see Language Reference.
Supported Features
Visual Studio Code provides many helpful features for editing Daml files and we recommend reviewing Visual Studio Code Basics and Visual Studio Code Keyboard Shortcuts for OS X. The Daml Studio extension for Visual Studio Code provides the following Daml-specific features:
Symbols and Problem Reporting
Use the commands listed below to navigate between symbols, rename them, and inspect any problems detected in your Daml files. Symbols are identifiers such as template names, lambda arguments, variables, and so on.
| Command | Shortcut (OS X) |
|---|---|
| Go to Definition | F12 |
| Peek Definition | ⌥F12 |
| Rename Symbol | F2 |
| Go to Symbol in File | ⇧⌘O |
| Go to Symbol in Workspace | ⌘T |
| Find all References | ⇧F12 |
| Problems Panel | ⇧⌘M |
Note
You can also start a command by typing its name into the command palette (press ⇧⌘P or F1). The command palette
is also handy for looking up keyboard shortcuts.
Note
- Rename Symbol, Go to Symbol in File, Go to Symbol in Workspace, and Find all References work on: choices, record fields, top-level definitions, let-bound variables, lambda arguments, and modules
- Go to Definition and Peek Definition work on: top-level definitions, let-bound variables, lambda arguments, and modules
Hover Tooltips
You can hover over most symbols in the code to display additional information such as its type.
Daml Script Results
Top-level declarations of type Script are decorated with
a Script results code lens.
You can click on the code lens to inspect the
execution transaction graph and the active contracts.
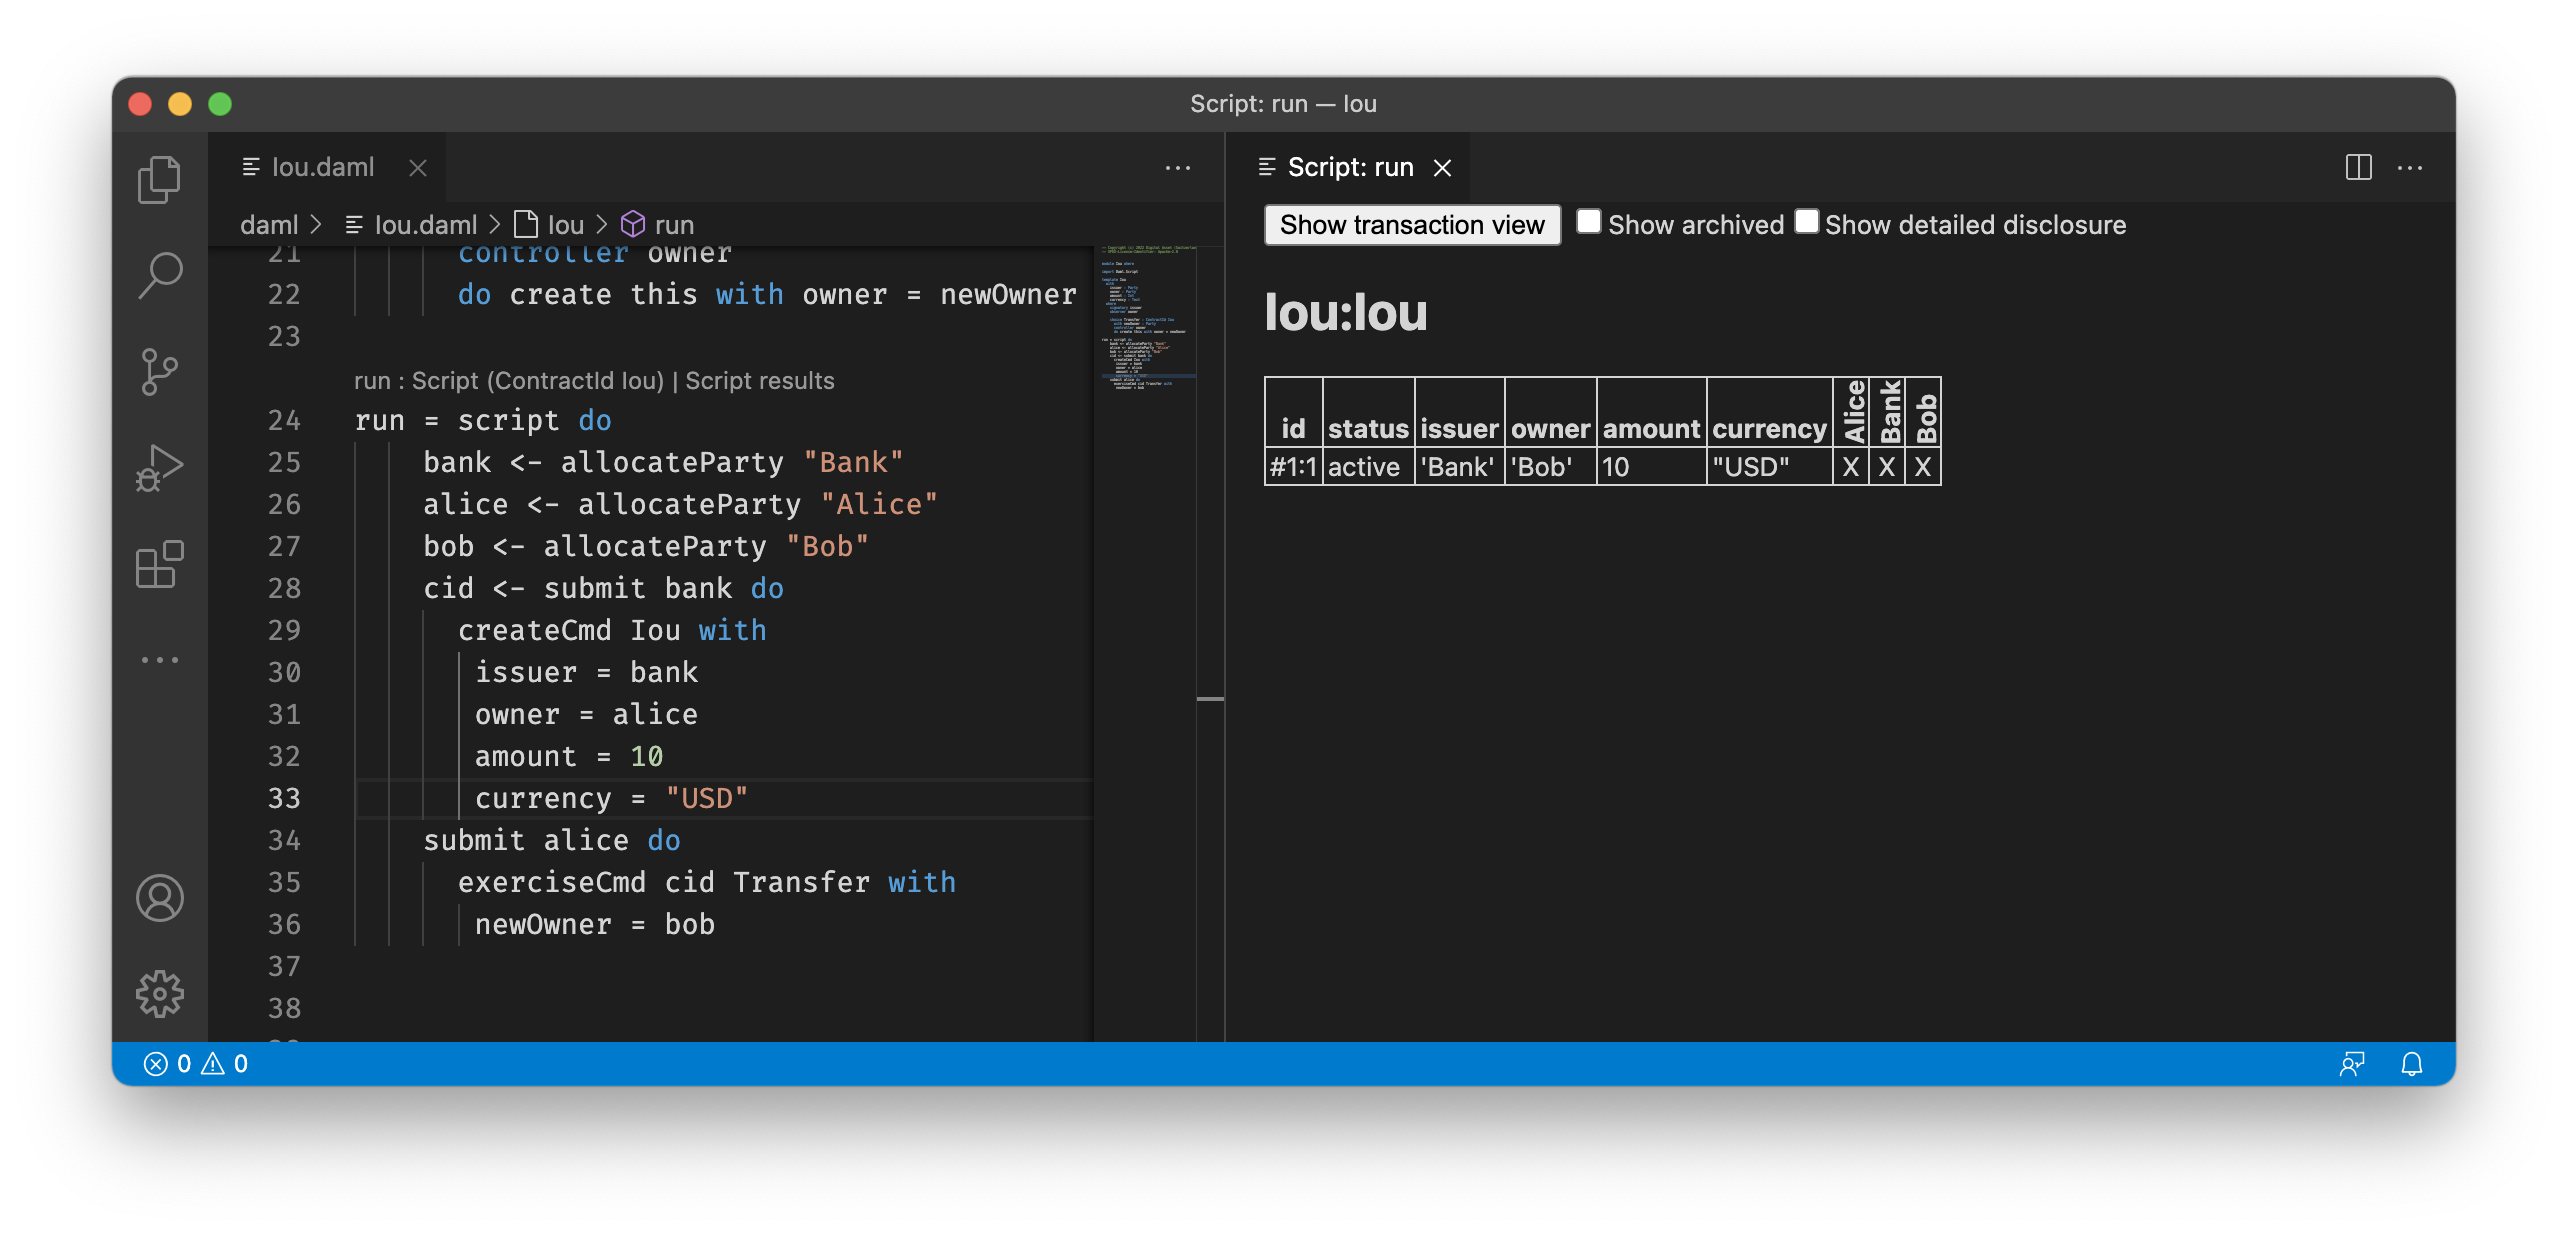
For the script from the Iou
module, you get the following table displaying all contracts that are
active at the end of the script. The first column displays the
contract id. The columns afterwards represent the fields of the
contract and finally you get one column per party with an X if the
party can see the contract or a - if not.
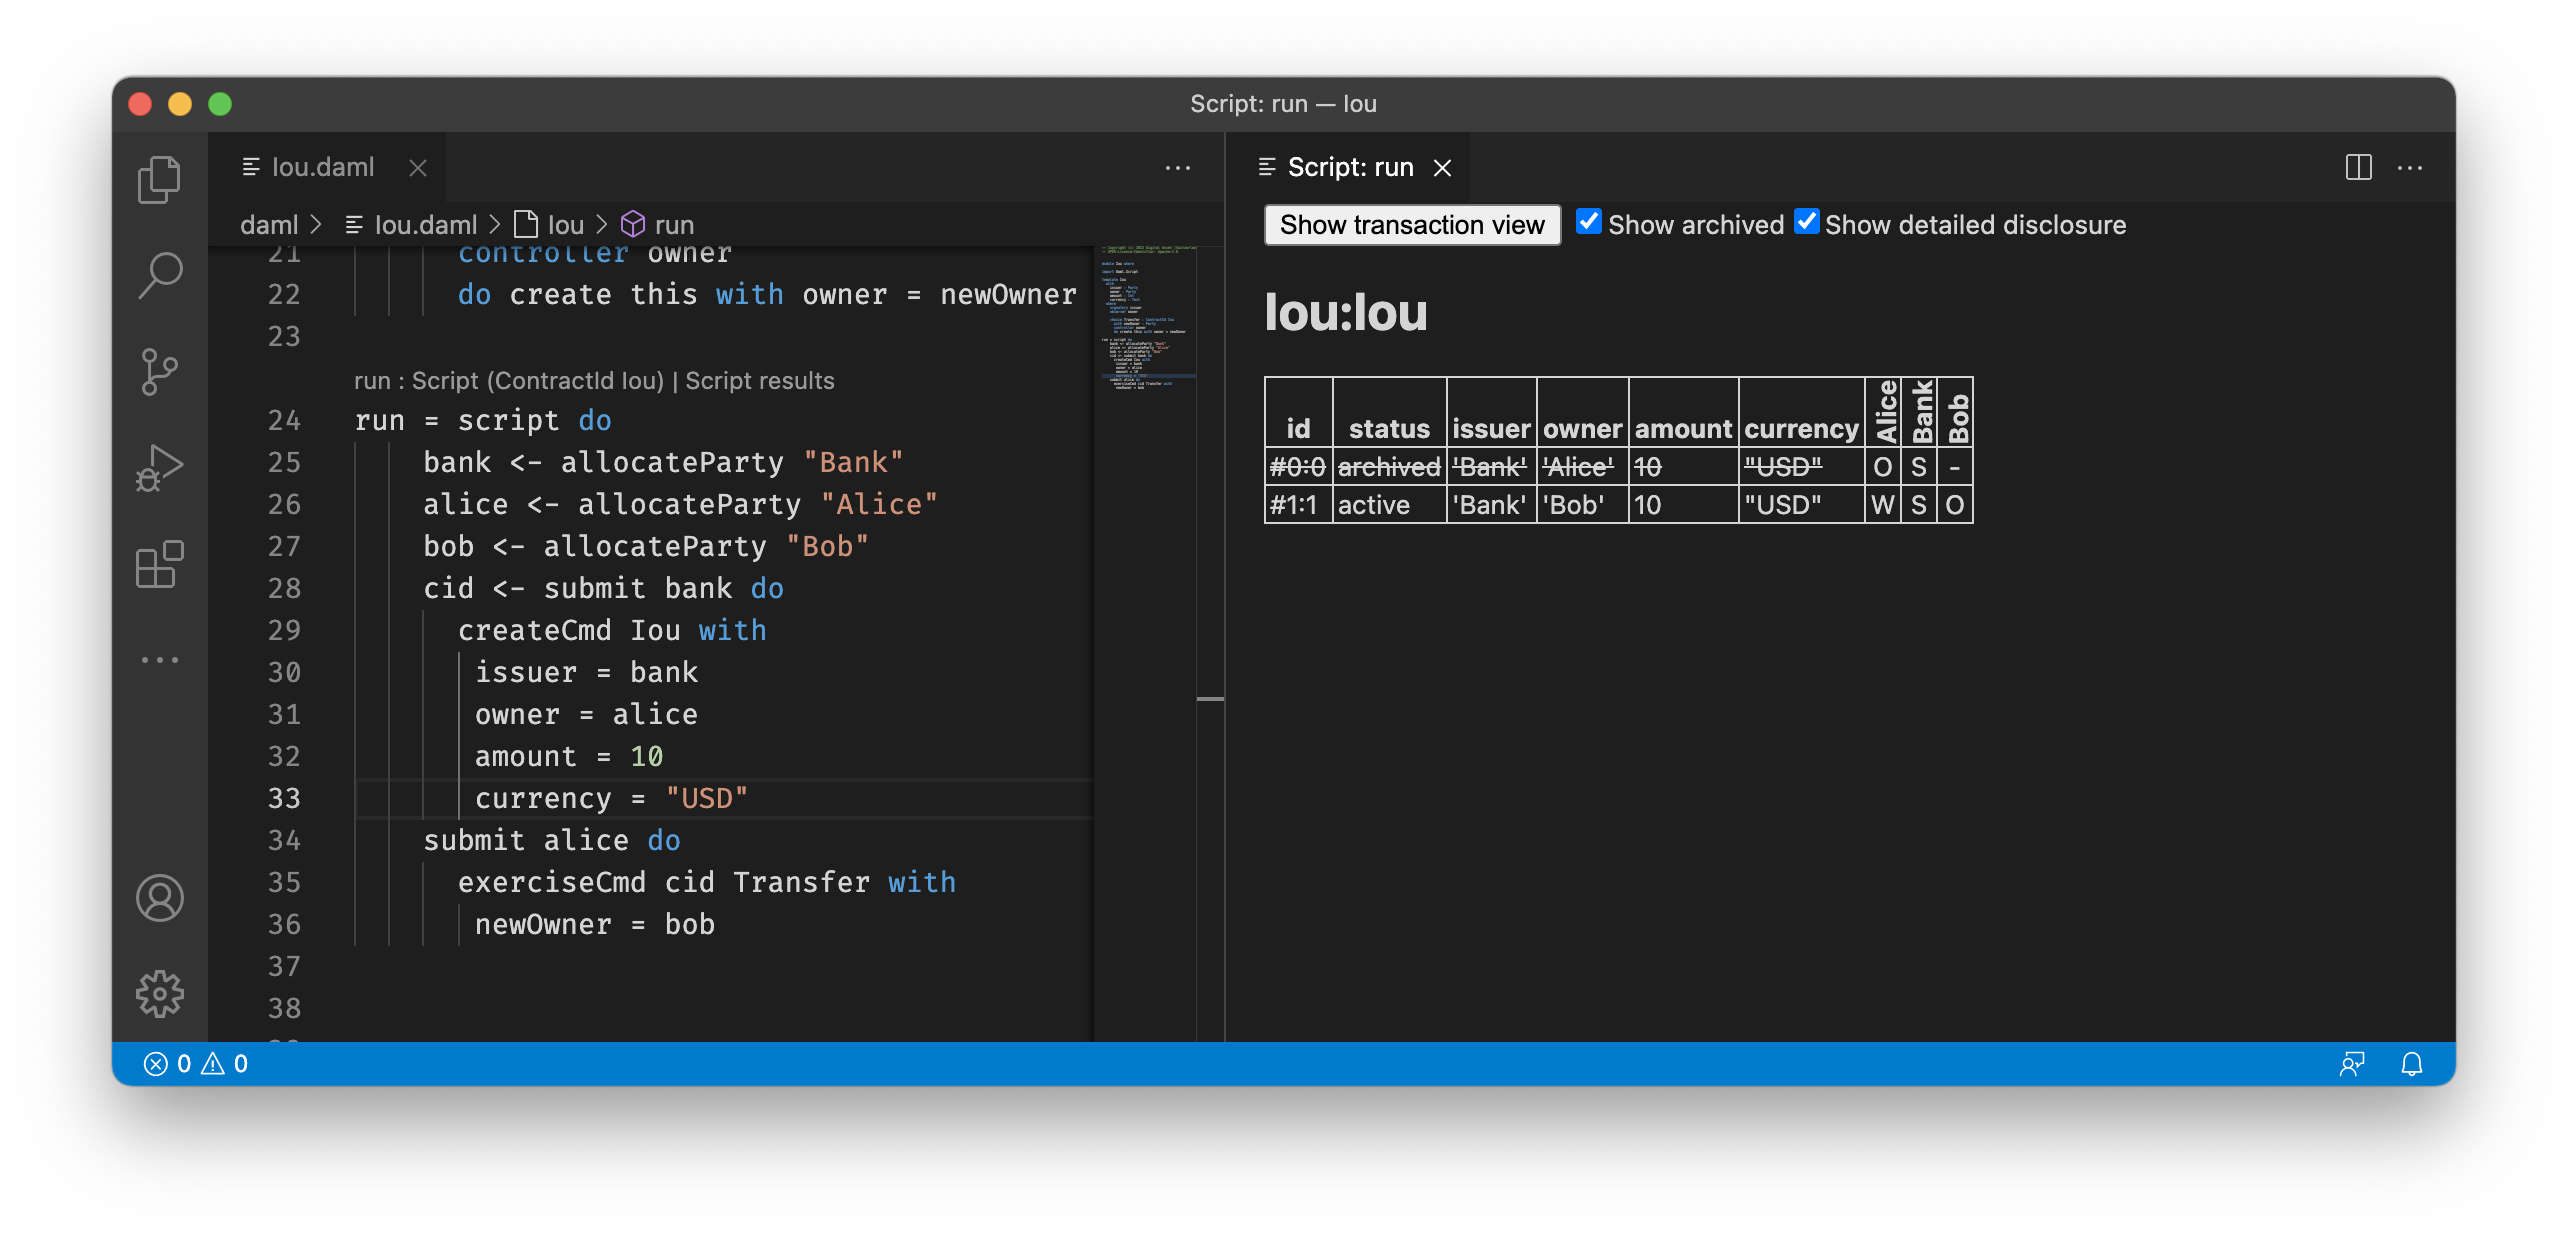
If you want more details, you can click on the Show archived checkbox, which extends the table to include archived contracts, and on the Show detailed disclosure checkbox, which displays why the contract is visible to each party, based on four categories:
S, the party sees the contract because they are a signatory on the contract.O, the party sees the contract because they are an observer on the contract.W, the party sees the contract because they witnessed the creation of this contract, e.g., because they are an actor on theexercisethat created it.D, the party sees the contract because they have been divulged the contract, e.g., because they witnessed an exercise that resulted in afetchof this contract.
For details on the meaning of those four categories, refer to the
Daml Ledger Model.
For the example above, the resulting table looks as follows. You can see the
archived Bank contract and the active Bank contract whose creation
Alice has witnessed by virtue of being an actor on the exercise that
created it.
If you want to see the detailed transaction graph you can click on the
Show transaction view button. The transaction graph
consists of transactions, each of which contain one or more updates to the
ledger, that is creates and exercises. The transaction graph also records
fetches of contracts.
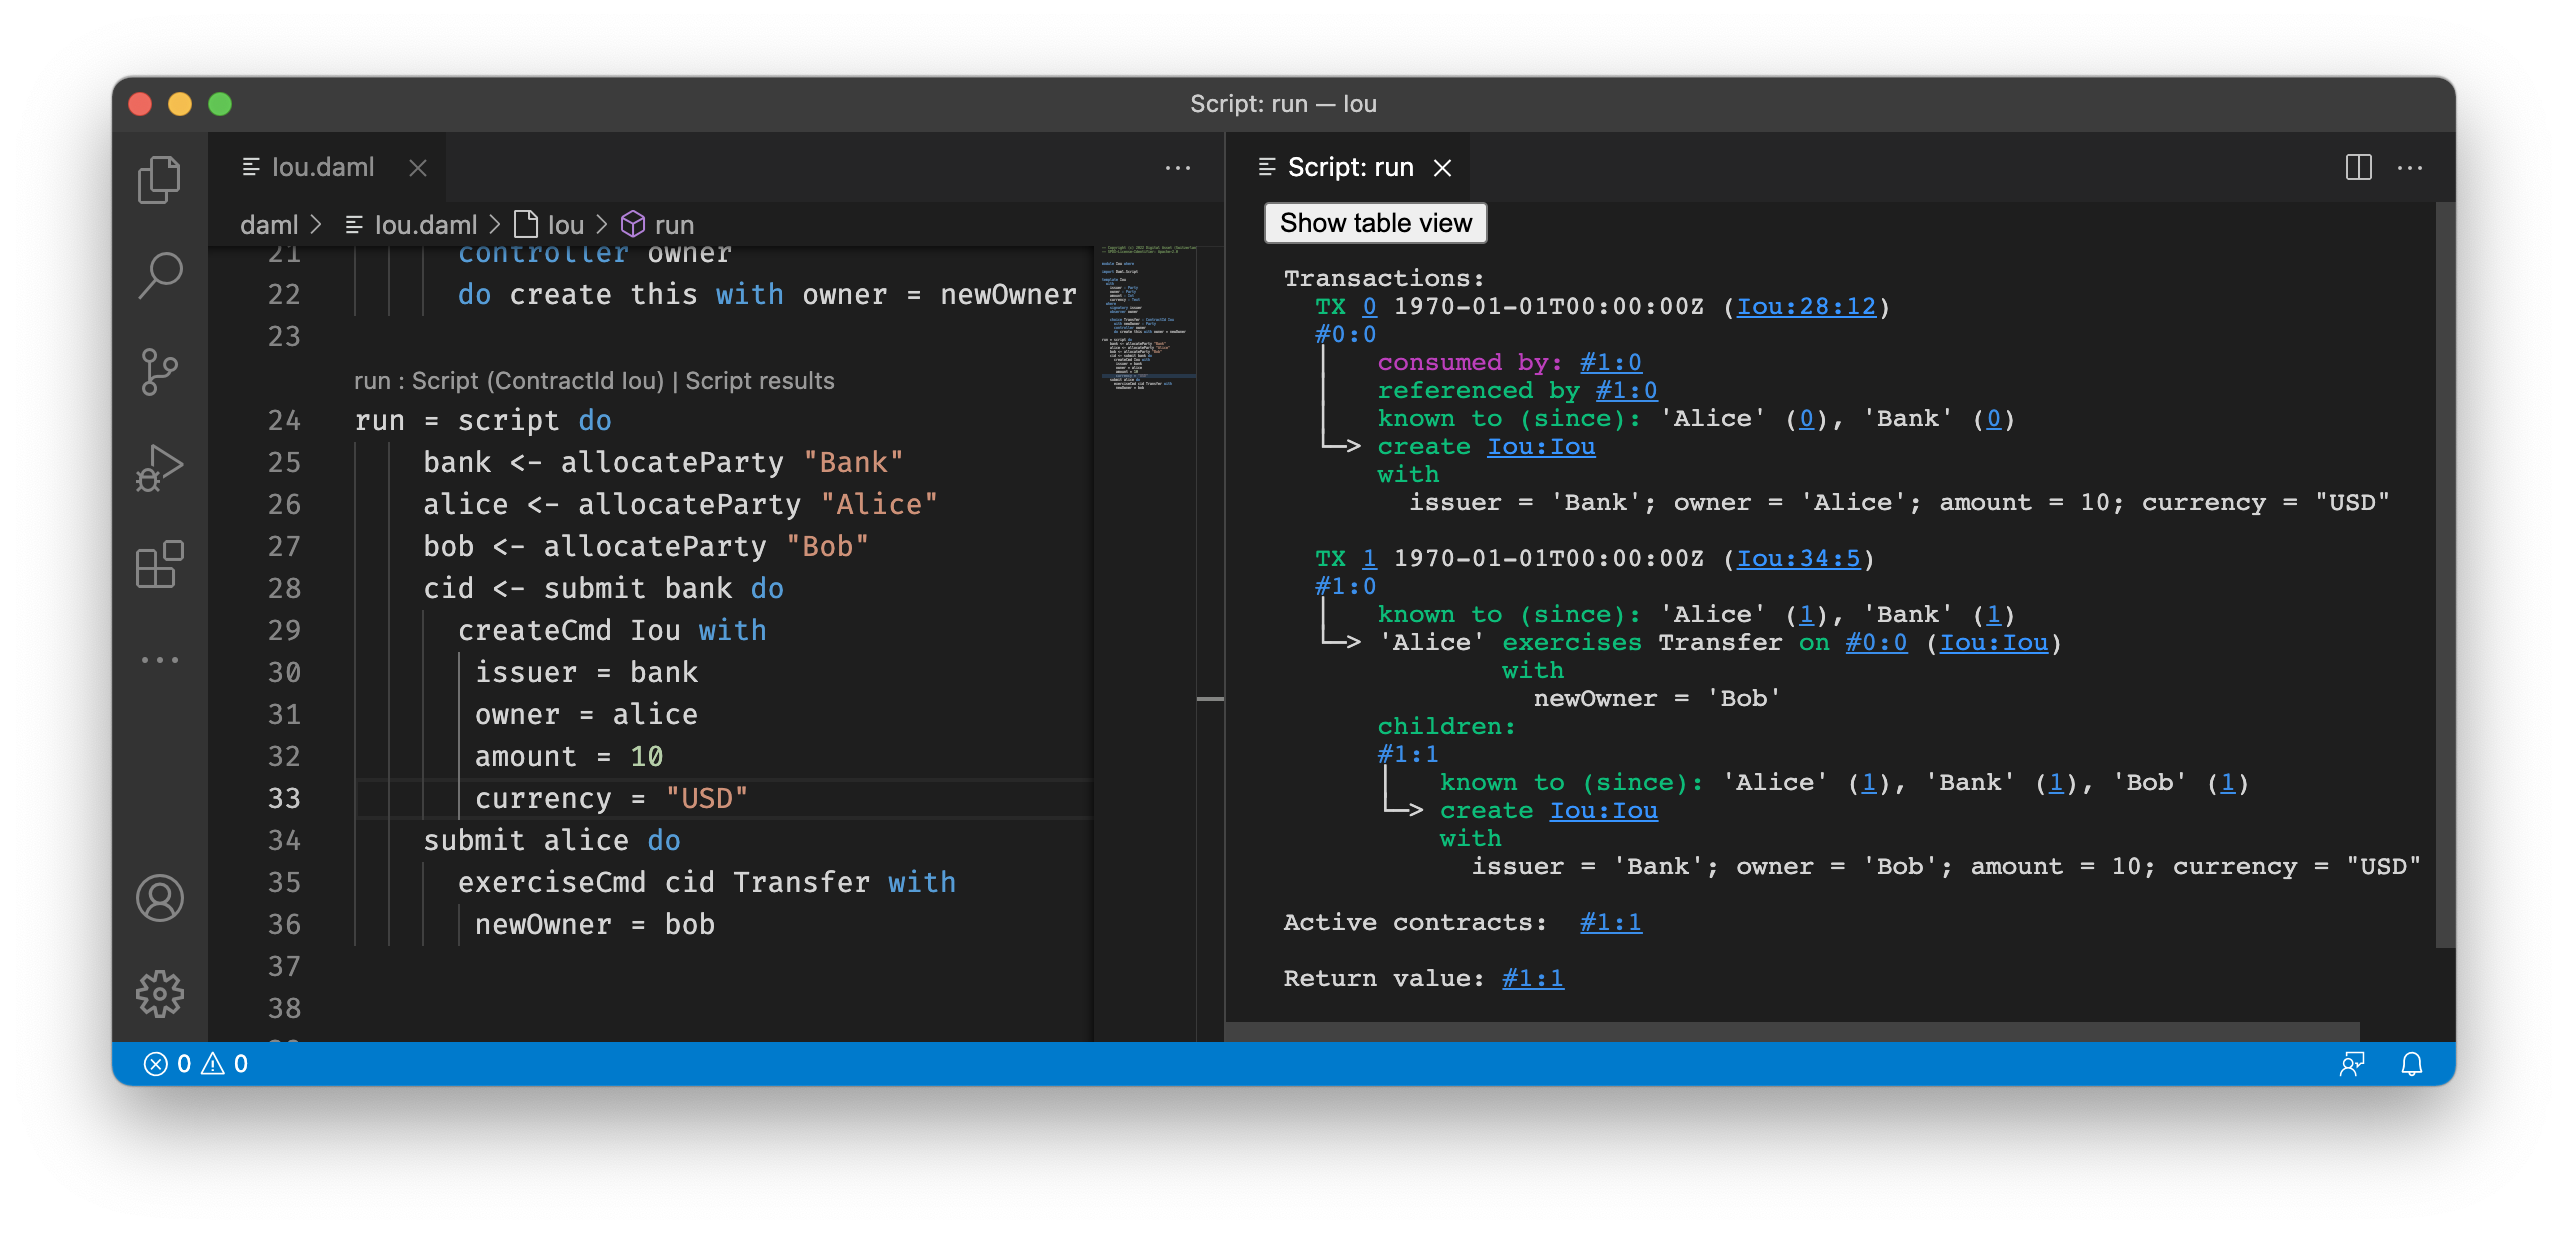
For example a script for the Iou module looks as follows:
Script results
Each transaction is the result of executing a step in the script. In the
image below, the transaction #0 is the result of executing the first
line of the script (line 20), where the Iou is created by the bank. The following
information can be gathered from the transaction:
- The result of the first script transaction
#0was the creation of theIoucontract with the argumentsbank,10, and"USD". - The created contract is referenced in transaction
#1, step0. - The created contract was consumed in transaction
#1, step0. - A new contract was created in transaction
#1, step1, and has been divulged to parties ‘Alice’, ‘Bob’, and ‘Bank’. - At the end of the script only the contract created in
#1:1remains. - The return value from running the script is the contract identifier
#1:1. - And finally, the contract identifiers assigned in script execution correspond to
the script step that created them (e.g.
#1).
You can navigate to the corresponding source code by clicking on the location
shown in parenthesis (e.g. Iou:25:12, which means the Iou module, line 25 and column 1).
You can also navigate between transactions by clicking on the transaction and contract ids (e.g. #1:0).
Daml Snippets
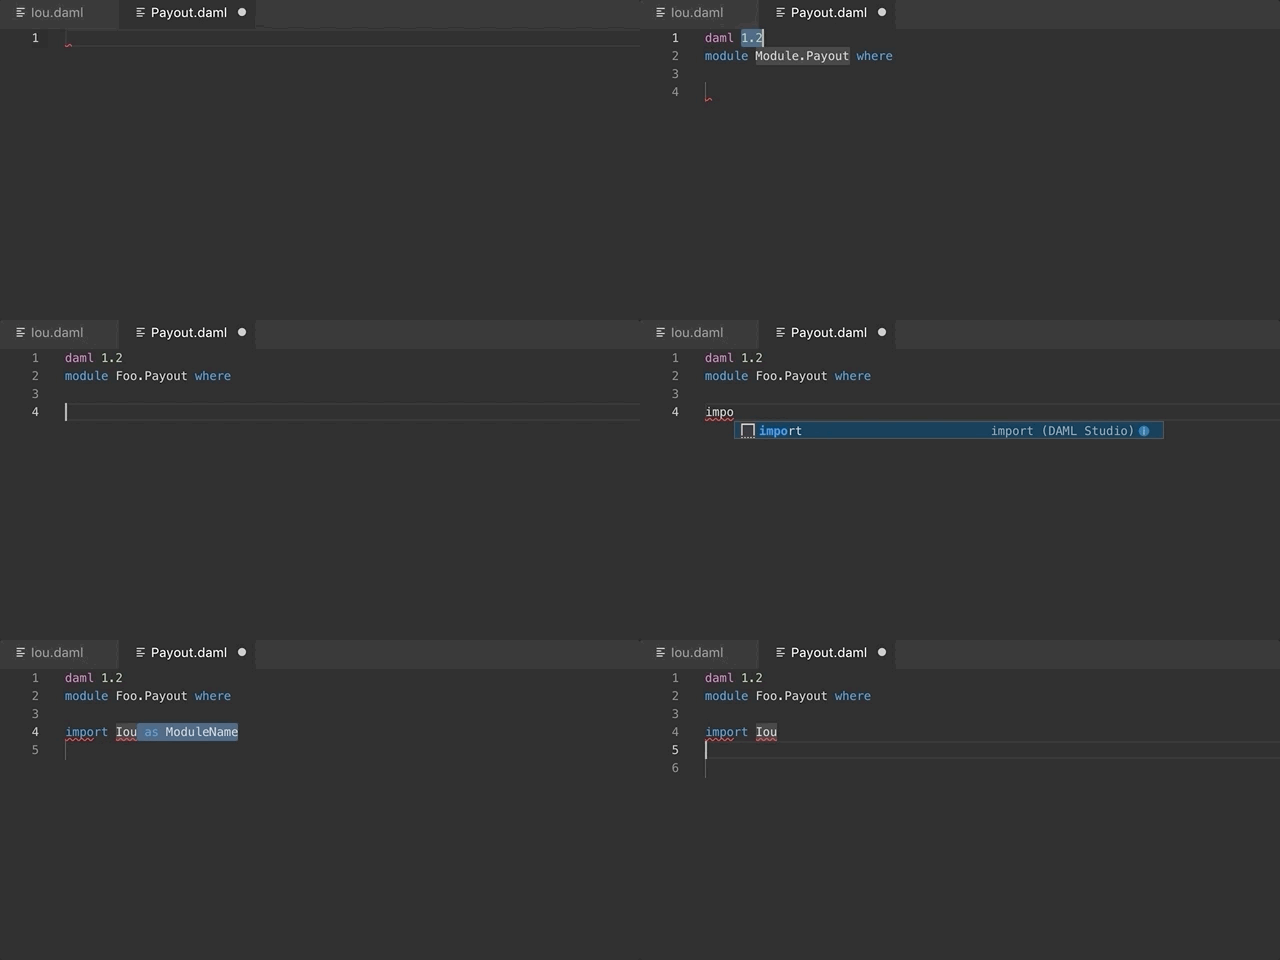
You can automatically complete a number of “snippets” when editing a Daml
source file. By default, hitting ^-Space after typing a Daml keyword
displays available snippets that you can insert.
To define your own workflow around Daml snippets, adjust your user settings in Visual Studio Code to include the following options:
{
  "editor.tabCompletion": true,
  "editor.quickSuggestions": false
}
With those changes in place, you can simply hit Tab after a keyword to insert the code pattern.
You can develop your own snippets by following the instructions in
Creating your own Snippets to create an appropriate daml.json
snippet file.
Common Script Errors
During Daml execution, errors can occur due to exceptions (e.g. use of “abort”, or division by zero), or due to authorization failures. You can expect to run into the following errors when writing Daml.
When a runtime error occurs in a script execution, the script result view shows the error together with the following additional information, if available:
- Location of the failed commit
- If the failing part of the script was a
submitCmd, the source location of the call tosubmitCmdwill be displayed. - Stack trace
- A list of source locations that were encountered before the error occurred. The last encountered location is the first entry in the list.
- Ledger time
- The ledger time at which the error occurred.
- Partial transaction
- The transaction that is being constructed, but not yet committed to the ledger.
- Committed transaction
- Transactions that were successfully committed to the ledger prior to the error.
- Trace
- Any messages produced by calls to
traceanddebug.
Abort, Assert, and Debug
The abort, assert and debug inbuilt functions can be used in updates and scripts. All three can be used to output messages, but abort and assert can additionally halt the execution:
abortTest = script do
  debug "hello, world!"
  abort "stop"
Script execution failed:
  Unhandled exception:  DA.Exception.GeneralError:GeneralError with
                          message = "stop"

Ledger time: 1970-01-01T00:00:00Z

Trace:
  "hello, world!"
Missing Authorization on Create
If a contract is being created without approval from all authorizing parties the commit will fail. For example:
template Example
  with
    party1 : Party; party2 : Party
  where
    signatory party1
    signatory party2

example = script do
  alice <- allocateParty "Alice"
  bob <- allocateParty "Bob"
  alice `submit` createCmd Example with
    party1 = alice
    party2 = bob
Execution of the example script fails due to ‘Bob’ being a signatory in the contract, but not authorizing the create:
Script execution failed:
  #0: create of CreateAuthFailure:Example at unknown source
      failed due to a missing authorization from 'Bob'

Ledger time: 1970-01-01T00:00:00Z

Partial transaction:
  Sub-transactions:
     #0
     └─> Alice creates CreateAuthFailure:Example
         with
           party1 = 'Alice'; party2 = 'Bob'
To create the “Example” contract one would need to bring both parties to authorize the creation via a choice, for example ‘Alice’ could create a contract giving ‘Bob’ the choice to create the ‘Example’ contract.
Missing Authorization on Exercise
Similarly to creates, exercises can also fail due to missing authorizations when a party that is not a controller of a choice exercises it.
template Example
  with
    owner : Party
    friend : Party
  where
    signatory owner
    observer friend

    choice Consume : ()
      controller owner
      do return ()

    choice Hello : ()
      controller friend
      do return ()

example = script do
  alice <- allocateParty "Alice"
  bob <- allocateParty "Bob"
  cid <- alice `submit` createCmd Example with
    owner = alice
    friend = bob
  bob `submit` exerciseCmd cid Consume
The execution of the example script fails when ‘Bob’ tries to exercise the choice ‘Consume’ of which he is not a controller
Script execution failed:
  #1: exercise of Consume in ExerciseAuthFailure:Example at unknown source
      failed due to a missing authorization from 'Alice'

Ledger time: 1970-01-01T00:00:00Z

Partial transaction:
  Failed exercise:
    exercises Consume on #0:0 (ExerciseAuthFailure:Example)
    with
  Sub-transactions:
    0
    └─> 'Alice' exercises Consume on #0:0 (ExerciseAuthFailure:Example)
                with

Committed transactions:
  TX #0 1970-01-01T00:00:00Z (unknown source)
  #0:0
  │   disclosed to (since): 'Alice' (#0), 'Bob' (#0)
  └─> 'Alice' creates ExerciseAuthFailure:Example
              with
                owner = 'Alice'; friend = 'Bob'
From the error we can see that the parties authorizing the exercise (‘Bob’) is not a subset of the required controlling parties.
Contract Not Visible
Contract not being visible is another common error that can occur when a contract that is being fetched or exercised has not been disclosed to the committing party. For example:
template Example
  with owner: Party
  where
    signatory owner

    choice Consume : ()
      controller owner
      do return ()

example = script do
  alice <- allocateParty "Alice"
  bob <- allocateParty "Bob"
  cid <- alice `submit` createCmd Example with owner = alice
  bob `submit` exerciseCmd cid Consume
In the above script the ‘Example’ contract is created by ‘Alice’ and makes no mention of the party ‘Bob’ and hence does not cause the contract to be disclosed to ‘Bob’. When ‘Bob’ tries to exercise the contract the following error would occur:
Script execution failed:
  Attempt to fetch or exercise a contract not visible to the reading parties.
  Contract:  #0:0 (NotVisibleFailure:Example)
  actAs: 'Bob'
  readAs:
  Disclosed to: 'Alice'

Ledger time: 1970-01-01T00:00:00Z

Partial transaction:

Committed transactions:
  TX #0 1970-01-01T00:00:00Z (unknown source)
  #0:0
  │   disclosed to (since): 'Alice' (#0)
  └─> 'Alice' creates NotVisibleFailure:Example
              with
                owner = 'Alice'
To fix this issue the party ‘Bob’ should be made a controlling party in one of the choices.
Work with Multiple Packages
Often a Daml project consists of multiple packages, e.g., one
containing your templates and one containing a Daml trigger so that
you can keep the templates stable while modifying the trigger. It is
possible to work on multiple packages in a single session of Daml
studio but you have to keep some things in mind. You can see the
directory structure of a simple multi-package project consisting of
two packages pkga and pkgb below:
.
├── daml.yaml
├── pkga
│   ├── daml
│   │   └── A.daml
│   └── daml.yaml
└── pkgb
    ├── daml
    │   └── B.daml
    └── daml.yaml
pkga and pkgb are regular Daml projects with a daml.yaml
and a Daml module. In addition to the daml.yaml files for the
respective packages, you also need to add a daml.yaml to the root
of your project. This file only needs to specify the SDK
version. Replace X.Y.Z by the SDK version you specified in the
daml.yaml files of the individual packages.
sdk-version: X.Y.Z
You can then open Daml Studio once in the root of your project and
work on files in both packages. Note that if pkgb refers to
pkga.dar in its dependencies field, changes will not be picked
up automatically. This is always the case even if you open Daml Studio
in pkgb. However, for multi-package projects there is an
additional caveat: You have to both rebuild pkga.dar using daml
build and then build pkgb using daml build before restarting
Daml Studio.


