
Static Configuration
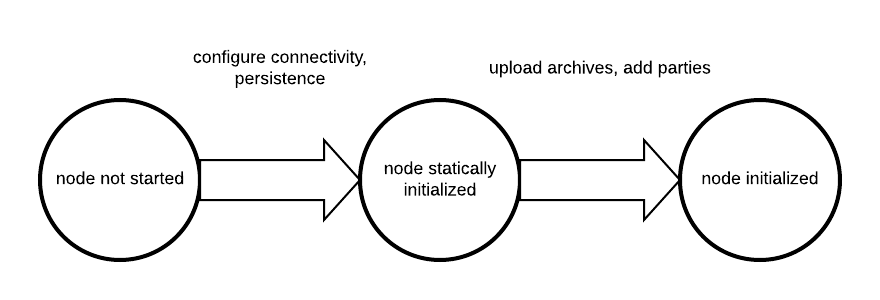
Canton differentiates between static and dynamic configuration. Static configuration is immutable and therefore has to be known from the beginning of the process start. An example for a static configuration are the connectivity parameters to the local persistence store or the port the admin-apis should bind to. On the other hand, connecting to a domain or adding parties however is not a static configuration and therefore is not set via the config file but through the administration APIs or the console.
The configuration files themselves are written in HOCON format with some extensions:
- Durations are specified scala durations using a
<length><unit>format. Valid units are defined by scala directly, but behave as expected usingms,s,m,h,dto refer to milliseconds, seconds, minutes, hours and days. Durations have to be non-negative in our context.
Canton does not run one node, but any number of nodes, be it domain or participant nodes in the same process. Therefore, the root configuration allows to define several instances of domain and participant nodes together with a set of general process parameters.
A sample configuration file for two participant nodes and a single domain can be seen below.
canton {
  participants {
    participant1 {
      storage.type = memory
      admin-api.port = 5012
      ledger-api.port = 5011
    }
    participant2 {
      storage.type = memory
      admin-api.port = 5022
      ledger-api.port = 5021
    }
  }
  domains {
    mydomain {
      storage.type = memory
      public-api.port = 5018
      admin-api.port = 5019
    }
  }
  // enable ledger_api commands for our getting started guide
  features.enable-testing-commands = yes
}
Configuration reference
The Canton configuration file for static properties is based on PureConfig. PureConfig maps Scala case classes and their class structure into analogue configuration options (see e.g. the PureConfig quick start for an example). Therefore, the ultimate source of truth for all available configuration options and the configuration file syntax is given by the appropriate scaladocs of the CantonConfig classes.
When understanding the mapping from scaladocs to configuration, please keep in mind that:
- CamelCase Scala names are mapped to lowercase-with-dashes names in configuration files, e.g.
domainParametersin the scaladocs becomesdomain-parametersin a configuration file (dash, not underscore). Option[<scala-class>]means that the configuration can be specified but doesn’t need to be, e.g. you can specify a JWT token viatoken=tokenin a remote participant configuration, but not specifyingtokenis also valid.
Configuration Compatibility
The enterprise edition configuration files extend the community configuration. As such, any community configuration can run with an enterprise binary, whereas not every enterprise configuration file will also work with community versions.
Advanced Configurations
Configuration files can be nested and combined together. First, using the include directive (with relative paths), a
configuration file can include other configuration files.
canton {
    domains {
        include "domain1.conf"
    }
}
Second, by providing several configuration files, we can override configuration settings using explicit configuration option paths:
canton.participants.myparticipant.admin-api.port = 11234
If the same key is included in multiple configurations, then the last definition has highest precedence.
Furthermore, HOCON supports substituting environment variables for config values using the syntax
key = ${ENV_VAR_NAME} or optional substitution key = ${?ENV_VAR_NAME}, where the key will only be set
if the environment variable exists.
Configuration Mixin
Even more than multiple configuration files, we can leverage PureConfig to create shared configuration items that refer to environment variables. A handy example is the following, which allows to share database configuration settings in a setup involving several participant or domain nodes:
# Postgres persistence configuration mixin
#
# This file defines a shared configuration resources. You can mix it into your configuration by
# refer to the shared storage resource and add the database name.
#
# Example:
#   participant1 {
#     storage = ${_shared.storage}
#     storage.config.properties.databaseName = "participant1"
#   }
#
# The user and password credentials are set to "canton" and "supersafe". As this is not "supersafe", you might
# want to either change this configuration file or pass the settings in via environment variables.
#
_shared {
  storage {
    type = postgres
    config {
      dataSourceClass = "org.postgresql.ds.PGSimpleDataSource"
      properties = {
        serverName = "localhost"
        serverName = ${?POSTGRES_HOST}
        portNumber = "5432"
        portNumber = ${?POSTGRES_PORT}
        user = ${POSTGRES_USER}
        password = ${POSTGRES_PASSWORD}
      }
    }
    // If defined, will configure the number of database connections per node.
    // Please ensure that your database is setup with sufficient connections.
    // If not configured explicitly, every node will create one connection per core on the host machine. This is
    // subject to change with future improvements.
    max-connections = ${?POSTGRES_NUM_CONNECTIONS}
  }
}
Such a definition can subsequently be referenced in the actual node definition:
canton {
    domains {
        mydomain {
            storage = ${_shared.storage}
            storage.config.properties.databaseName = ${CANTON_DB_NAME_DOMAIN}
        }
    }
}
Multiple Domains
A Canton configuration allows to define multiple domains. Also, a Canton participant can connect to multiple domains. This is however only supported as a preview feature and not yet suitable for production use.
In particular, contract key uniqueness cannot be enforced over multiple domains. In this situation, we need to turn contract key uniqueness off by setting
canton {
    domains {
        alpha {
            // subsequent changes have no effect and the mode of a node can never be changed
            domain-parameters.unique-contract-keys = false
        }
    }
    participants {
        participant1 {
            // subsequent changes have no effect and the mode of a node can never be changed
            parameters.unique-contract-keys = false
        }
    }
}
Please note that the setting is final and can not be changed subsequently. We will provide a migration path once multi-domain is fully implemented.
Fail Fast Mode
Be default, Canton will fail to start if it cannot access some external dependency such as the database. This is
preferable during initial deployment and development, as it provides instantaneous feedback, but can cause problems
in production. As an example, if Canton is started with a database in parallel, the Canton process would fail if the
database is not ready before the Canton process attempts to access it. To avoid this problem, you can configure a node
to wait indefinitely for an external dependency such as a database to start. The config option below will disable
the “fail fast” behaviour for participant1.
canton.participants.participant1.init.startup-fail-fast = "no"
This option should be used with care as, by design, it can cause infinite, noisy waits.
Persistence
Participant and domain nodes both require storage configurations. Both use the same configuration format and therefore support the same configuration options. There are three different configurations available:
Memory- Using simple, hash-map backed in-memory stores which are deleted whenever a node is stopped.Postgres- To use with the open source relational database Postgres.Oracle- To use with Oracle DB (Enterprise only)
In order to set a certain storage type, we have to edit the storage section of the particular node, such
as canton.participants.myparticipant.storage.type = memory. Memory storage does not require any other
setting.
For the actual database driver, Canton does not directly define how they are configured, but leverages a third party library (slick) for it, exposing all configuration methods therein. If you need to, please consult the respective detailed documentation to learn about all configuration options if you want to leverage any exotic option. Here, we will only describe our default, recommended and supported setup.
It is recommended to use a connection pool in production environments and consciously choose the size of the pool.
Please note that Canton will create, manage and upgrade the database schema directly. You don’t have to create tables yourselves.
Consult the example/03-advanced-configuration directory to get a set of configuration files to set
your nodes up.
Postgres
Our reference driver based definition for Postgres configuration is:
# Postgres persistence configuration mixin
#
# This file defines a shared configuration resources. You can mix it into your configuration by
# refer to the shared storage resource and add the database name.
#
# Example:
#   participant1 {
#     storage = ${_shared.storage}
#     storage.config.properties.databaseName = "participant1"
#   }
#
# The user and password credentials are set to "canton" and "supersafe". As this is not "supersafe", you might
# want to either change this configuration file or pass the settings in via environment variables.
#
_shared {
  storage {
    type = postgres
    config {
      dataSourceClass = "org.postgresql.ds.PGSimpleDataSource"
      properties = {
        serverName = "localhost"
        serverName = ${?POSTGRES_HOST}
        portNumber = "5432"
        portNumber = ${?POSTGRES_PORT}
        user = ${POSTGRES_USER}
        password = ${POSTGRES_PASSWORD}
      }
    }
    // If defined, will configure the number of database connections per node.
    // Please ensure that your database is setup with sufficient connections.
    // If not configured explicitly, every node will create one connection per core on the host machine. This is
    // subject to change with future improvements.
    max-connections = ${?POSTGRES_NUM_CONNECTIONS}
  }
}
You may use this configuration file with environment variables or adapt it accordingly. More detailed setup instructions
and options are available in the Slick reference guide.
The above configurations are included in the examples/03-advanced-configuration/storage folder and are sufficient
to get going.
Max Connection Settings
The storage configuration can further be tuned using the following additional setting:
canton.participants.<service-name>.storage.max-connections = X
This allows for setting the maximum number of DB connections used by a Canton node. If None or non-positive, the value will be the number of processors. The setting has no effect, if the number of connections is already set via slick options (i.e. storage.config.numThreads).
If you are unsure how to size your connection pools, this article may be a good starting point.
Additionally, the number of parallel indexer connections can be configured via
canton.participants.<service-name>.parameters.indexer.ingestion-parallelism = Y
A Canton participant node will establish up to X + Y + 2 permanent connections with the database, whereas a domain node
will use up to X permanent connections, except for a sequencer with HA setup that will allocate up to 2X connections. During
startup, the node will use an additional set of at most X temporary connections during database initialisation.
Api Configuration
A domain node exposes two main APIs: the admin-api and the public-api, while the participant node exposes the ledger-api and the admin-api. In this section, we will explain what the APIs do and how they can be configured. All APIs are based on GRPC, which is an efficient RPC and streaming protocol with client support in almost all relevant programming languages. Native bindings can be built using the API definitions.
Default Ports
Canton assigns ports automatically for all the APIs of all the configured nodes if the port has not been configured explicitly. The ports are allocated according to the following scheme:
/** Participant node default ports */
val ledgerApiPort = defaultPortStart(4001)
val participantAdminApiPort = defaultPortStart(4002)

/** Domain node default ports */
val domainPublicApiPort = defaultPortStart(4201)
val domainAdminApiPort = defaultPortStart(4202)

/** External sequencer node default ports (enterprise-only) */
val sequencerPublicApiPort = defaultPortStart(4401)
val sequencerAdminApiPort = defaultPortStart(4402)

/** External mediator node default port (enterprise-only) */
val mediatorAdminApiPort = defaultPortStart(4602)

/** Domain node default ports */
val domainManagerAdminApiPort = defaultPortStart(4801)

/** Increase the default port number for each new instance by portStep */
private val portStep = 10
Administration API
The nature and scope of the admin api on participant and domain nodes has some overlap. As an example, you will find the same key management commands on the domain and the participant node API, whereas the participant has different commands to connect to several domains.
The configuration currently is simple (see the TLS example below) and just takes an address and a port.
The address defaults to 127.0.0.1 and a default port is assigned if not explicitly configured.
You should not expose the admin-api publicly in an unsecured way as it serves administrative purposes only.
TLS Configuration
Both, the Ledger API and the admin API provide the same TLS capabilities and can be configured using the same configuration directives. TLS provides end-to-end channel encryption between the server and client, and depending on the settings, server or mutual authentication.
A full configuration example is given by
ledger-api {
  address = "127.0.0.1" // IP / DNS must be SAN of certificate to allow local connections from the canton process
  port = 5041
  tls {
    // the certificate to be used by the server
    cert-chain-file = "./tls/participant.crt"
    // private key of the server
    private-key-file = "./tls/participant.pem"
    // trust collection, which means that all client certificates will be verified using the trusted
    // certificates in this store. if omitted, the JVM default trust store is used.
    trust-collection-file = "./tls/root-ca.crt"
    // define whether clients need to authenticate as well (default not)
    client-auth = {
      // none, optional and require are supported
      type = require
      // If clients are required to authenticate as well, we need to provide a client
      // certificate and the key, as Canton has internal processes that need to connect to these
      // APIs. If the server certificate is trusted by the trust-collection, then you can
      // just use the server certificates. Otherwise, you need to create separate ones.
      admin-client {
        cert-chain-file = "./tls/admin-client.crt"
        private-key-file = "./tls/admin-client.pem"
      }
    }
    // minimum-server-protocol-version = ...
    // ciphers = ...
  }
}
These TLS settings allow a connecting client to ensure that it is talking to the right server. In this example, we have also enabled client authentication, which means that the client needs to present a valid certificate (and have the corresponding private key). The certificate is valid if it has been signed by a key in the trust store.
The trust-collection-file allows us to provide a file based trust store. If omitted, the system
will default to the built-in JVM trust store. The file must contain all client certificates
(or parent certificates which were used to sign the client certificate) who are trusted to use
the API. The format is just a collection of PEM certificates (in the right order or hierarchy), not a
java based trust store.
In order to operate the server just with server-side authentication, you can just omit the section
on client-auth. However, if client-auth is set to require, then Canton also requires a client certificate,
as various Canton internal processes will connect to the process itself through the API.
All the private keys need to be in the pkcs8 PEM format.
By default, Canton only uses new versions of TLS and strong ciphers. You can also override
the default settings using the variables ciphers and protocols. If you set these settings to null,
the default JVM values will be used.
Note
Error messages on TLS issues provided by the networking library netty are less than optimal.
If you are struggling with setting up TLS, please enable DEBUG logging on the io.netty logger.
Note that the configuration hierarchy for a remote participant console is slightly different from the in-process console or participant shown above. For configuring a remote console with TLS, please see the scaladocs for a TlsClientConfig (see also how scaladocs relates to the configuration).
If you need to create a set of testing TLS certificates, you can use the following openssl commands:
DAYS=730

function create_key {
  local name=$1
  openssl genrsa -out "${name}.key" 4096
  # netty requires the keys in pkcs8 format, therefore convert them appropriately
  openssl pkcs8 -topk8 -nocrypt -in "${name}.key" -out "${name}.pem"
}

# create self signed certificate
function create_certificate {
  local name=$1
  local subj=$2
  openssl req -new -x509 -sha256 -key "${name}.key" \
              -out "${name}.crt" -days ${DAYS} -subj "$subj"
}

# create certificate signing request with subject and SAN
# we need the SANs as our certificates also need to include localhost or the
# loopback IP for the console access to the admin-api and the ledger-api
function create_csr {
  local name=$1
  local subj=$2
  local san=$3
  (
    echo "authorityKeyIdentifier=keyid,issuer"
    echo "basicConstraints=CA:FALSE"
    echo "keyUsage = digitalSignature, nonRepudiation, keyEncipherment, dataEncipherment"
  ) > ${name}.ext
  if [[ -n $san ]]; then
    echo "subjectAltName=${san}" >> ${name}.ext
  fi
  # create certificate (but ensure that localhost is there as SAN as otherwise, admin local connections won't work)
  openssl req -new -sha256 -key "${name}.key" -out "${name}.csr" -subj "$subj"
}

function sign_csr {
  local name=$1
  local sign=$2
  openssl x509 -req -sha256 -in "${name}.csr" -extfile "${name}.ext" -CA "${sign}.crt" -CAkey "${sign}.key" -CAcreateserial  \
               -out "${name}.crt" -days ${DAYS}
  rm "${name}.ext" "${name}.csr"
}

function print_certificate {
  local name=$1
  openssl x509 -in "${name}.crt" -text -noout
}

# create root certificate
create_key "root-ca"
create_certificate "root-ca" "/O=TESTING/OU=ROOT CA/emailAddress=canton@digitalasset.com"
#print_certificate "root-ca"

# create domain certificate
create_key "domain"
create_csr "domain" "/O=TESTING/OU=DOMAIN/CN=localhost/emailAddress=canton@digitalasset.com" "DNS:localhost,IP:127.0.0.1"
sign_csr "domain" "root-ca"
print_certificate "domain"

# create participant certificate
create_key "participant"
create_csr "participant" "/O=TESTING/OU=PARTICIPANT/CN=localhost/emailAddress=canton@digitalasset.com" "DNS:localhost,IP:127.0.0.1"
sign_csr "participant" "root-ca"

# create participant client key and certificate
create_key "admin-client"
create_csr "admin-client" "/O=TESTING/OU=ADMIN CLIENT/CN=localhost/emailAddress=canton@digitalasset.com"
sign_csr "admin-client" "root-ca"
print_certificate "admin-client"
Keep Alive
In order to prevent load-balancers or firewalls from terminating long running RPC calls in the event of some silence on the connection, all GRPC connections enable keep-alive by default. An example configuration for an adjusted setting is given below:
admin-api     {
  address = "127.0.0.1"
  port = 5022
  keep-alive-server {
    time = 40s
    timeout = 20s
    permit-keep-alive-time = 20s
  }
}
sequencer-client {
  keep-alive-client {
    time = 60s
    timeout = 30s
  }
}
GRPC client connections are configured with keep-alive-client, with two settings: time, and timeout.
The effect of the time and timeout settings are described in the GRPC documentation.
Servers can additionally change another setting: permit-keep-alive-time. This specifies the most aggressive keep-alive time
that a client is permitted to use. If a client uses keep-alive time that is more aggressive than the permit-keep-alive-time, the connection will be terminated with a GOAWAY frame with “too_many_pings” as the debug data.
This setting is described in more detail in the GRPC documentation
and GRPC manual page.
Max Inbound Message Size
The APIs exposed by both the participant (ledger API and admin API) as well as
by the domain (public API and admin API) have an upper limit on incoming message
size. To increase this limit to accommodate larger payloads, the flag
max-inbound-message-size has to be set for the respective API to the maximum
message size in bytes.
For example, to configure a participant’s ledger API limit to 20MB:
ledger-api {
  address = "127.0.0.1"
  port = 5021
  max-inbound-message-size = 20971520
}
Participant Configuration
Ledger Api
The configuration of the ledger API is similar to the admin API configuration, except that the
group starts with ledger-api instead of admin-api.
JWT Authorization
The Ledger Api supports JWT based authorization checks. Please consult the Daml SDK manual to understand the various configuration options and their security aspects. Canton exposes precisely the same JWT authorization options as explained therein.
In order to enable JWT authorization checks, your safe configuration options are
_shared {
  ledger-api {
    auth-services = [{
      // type can be
      //   jwt-rs-256-crt
      //   jwt-es-256-crt
      //   jwt-es-512-crt
      type = jwt-rs-256-crt
      // we need a certificate file (abcd.cert)
      certificate = ${JWT_CERTIFICATE_FILE}
    }]
  }
}
_shared {
  ledger-api {
    auth-services = [{
      type = jwt-rs-256-jwks
      // we need a URL to a jwks key, e.g. https://path.to/jwks.key
      url = ${JWT_URL}
    }]
  }
}
while there is also unsafe HMAC256 based support, which can be enabled using
_shared {
  ledger-api {
    auth-services = [{
      type = unsafe-jwt-hmac-256
      secret = "not-safe-for-production"
    }]
  }
}
Note that you can define several authorization plugins. If several are defined, the system will use the claim of the first auth plugin that does not return Unauthorized.
Domain Configurations
Public Api
The domain configuration requires the same configuration of the admin-api as the participant.
Next to the admin-api, we need to configure the public-api, which is the api where
all participants will connect to. There is a built in authentication of the restricted
services on the public api, leveraging the participant signing keys. You don’t need to do
anything in order to set this up. It is enforced automatically and can’t be turned off.
As with the admin-api, network traffic can (and should be) encrypted using TLS.
An example configuration section which enables TLS encryption and server-side TLS authentication is given by
public-api {
  port = 5028
  address = localhost // defaults to 127.0.0.1
  tls {
    cert-chain-file = "./tls/domain.crt"
    private-key-file = "./tls/domain.pem"
    // minimum-server-protocol-version = TLSv1.3, optional argument
    // ciphers = null // use null to default to JVM ciphers
  }
}
If TLS is used on the server side with a self-signed certificate, we need to pass the certificate chain during the connect call of the participant. Otherwise, the default root certificates of the Java runtime will be used. An example would be:
participant3.domains.connect(
  domainAlias = "acme",
  connection = s"https://$hostname:$port",
  certificatesPath = certs, // path to certificate chain file (.pem) of server
)
Domain Rules
Every domain has its own rules in terms of what parameters are used by the participants while running the protocol. The participants obtain these parameters before connecting to the domain. They can be configured using the specific parameter section. An example would be:
domain-parameters {
  // example setting
  unique-contract-keys = yes
}
The full set of available parameters can be found in the scala reference documentation.
Limiting concurrent GRPC requests (preview feature)
In large-scale deployments a Canton node may get more GRPC requests than it can cope with, leading to requests timing out. Canton has an experimental integration with concurrency-limits to limit the number of concurrent requests and prevent nodes from becoming overloaded.
Canton’s GRPC services can be configured to use various options provided by the concurrency-limits library:
- A fixed limit on concurrent requests
canton.participants.participant1.admin-api.concurrency-limit-beware-preview-feature {
    type = "fixed-limit"
    limit = "10"
}
- A dynamic limit for the number of concurrent requests, inspired by TCP Vegas
canton.participants.participant1.admin-api.concurrency-limit-beware-preview-feature {
    # Values are defaults from https://github.com/Netflix/concurrency-limits
    type = "vegas-limit"
    max-concurrency = 1000
    smoothing = 1.0
}
- A gradient-based algorithm to dynamically infer the concurrency limit
canton.participants.participant1.admin-api.concurrency-limit-beware-preview-feature {
    # Values are defaults from https://github.com/Netflix/concurrency-limits
    type = "gradient-2-limit"
    max-concurrency = 200
    smoothing = 0.2
    rtt-tolerance = 1.5
}
- Any of these options, with an added smoothing window
canton.participants.participant1.admin-api.concurrency-limit-beware-preview-feature {
    # Values are defaults from https://github.com/Netflix/concurrency-limits
    type = "windowed-limit"
    window-size = 10
    delegate = {
        type = gradient-2-limit
        max-concurrency = 200
        smoothing = 0.2
        rtt-tolerance = 1.5
    }
}
See the concurrency-limits library for more information on these different options.