Step-by-Step Instructions
These step-by-step instructions guide you through the setup, customization, and deployment of a Daml application using the daml-app-template.
Development Environment Set Up
Install Docker
Open terminal or PowerShell to check if you have Docker installed on your computer:
docker -vIf Docker is not installed, follow the download instructions for your operating system in the Get Docker Docs.
Install direnv
- Find the direnv package or binary for your operating system.
- Hook direnv into your shell.
Install Nix
Install Nix by following the Nixos.org download instructions.
Enable support for Nix flakes and the Nix command:
Open a file editor in the terminal:
sudo vim /etc/nix/nix.conf
If you installed a single user version of nix, the file to edit is located at:
sudo vim ~/.config/nix/nix.conf
Add the following line to the nix.conf file:
extra-experimental-features = nix-command flakes
Helpful vim commands:
i- insert textesc- escape insert, enter command mode:w- write to disk (save):x- exit
Install the Application
Clone the Repository
Open your terminal and run the following command to clone the
daml-app-templaterepository:git clone https://github.com/DACH-NY/daml-app-template cd daml-app-template
If you use SSH with GitHub, the ``git clone`` command is:
git clone git@github.com:DACH-NY/daml-app-template.git
Pull down the submodules required by the template (This step may require a few seconds):
git submodule update --init
Configure Artifactory credentials
Generate an Artifactory Identity Token with JFROG:
Note
If this is your first time setting up Daml, you may need permissions from Digital Asset. Email support@digitalasset.com and ask for Artifactory permissions.
Once you have secured an authorized JFROG account, set up your user profile and identity token.
Select the user profile icon in the top right corner, then select “Edit Profile”.
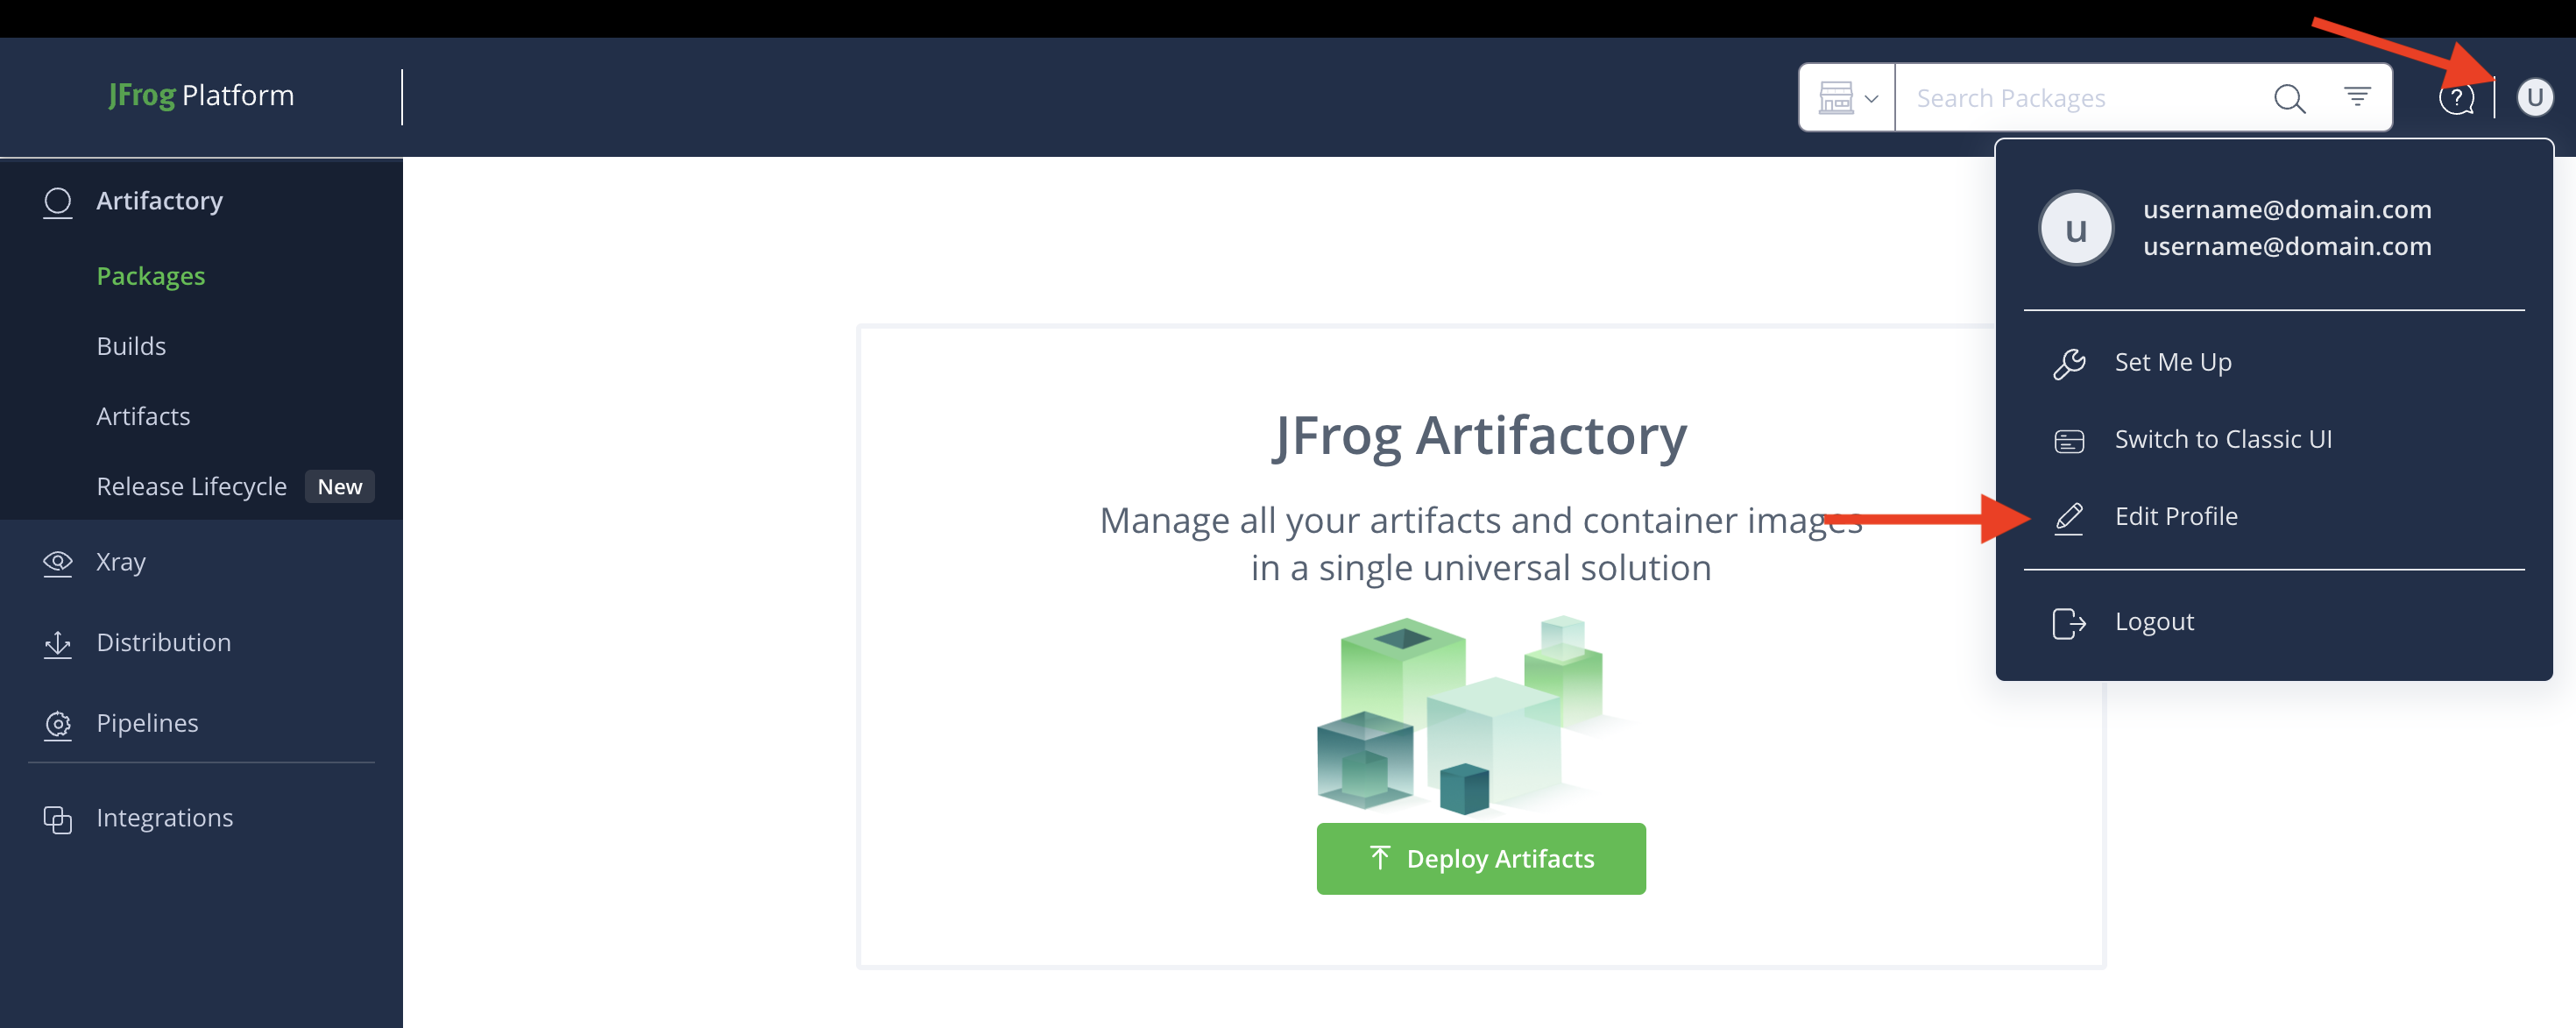
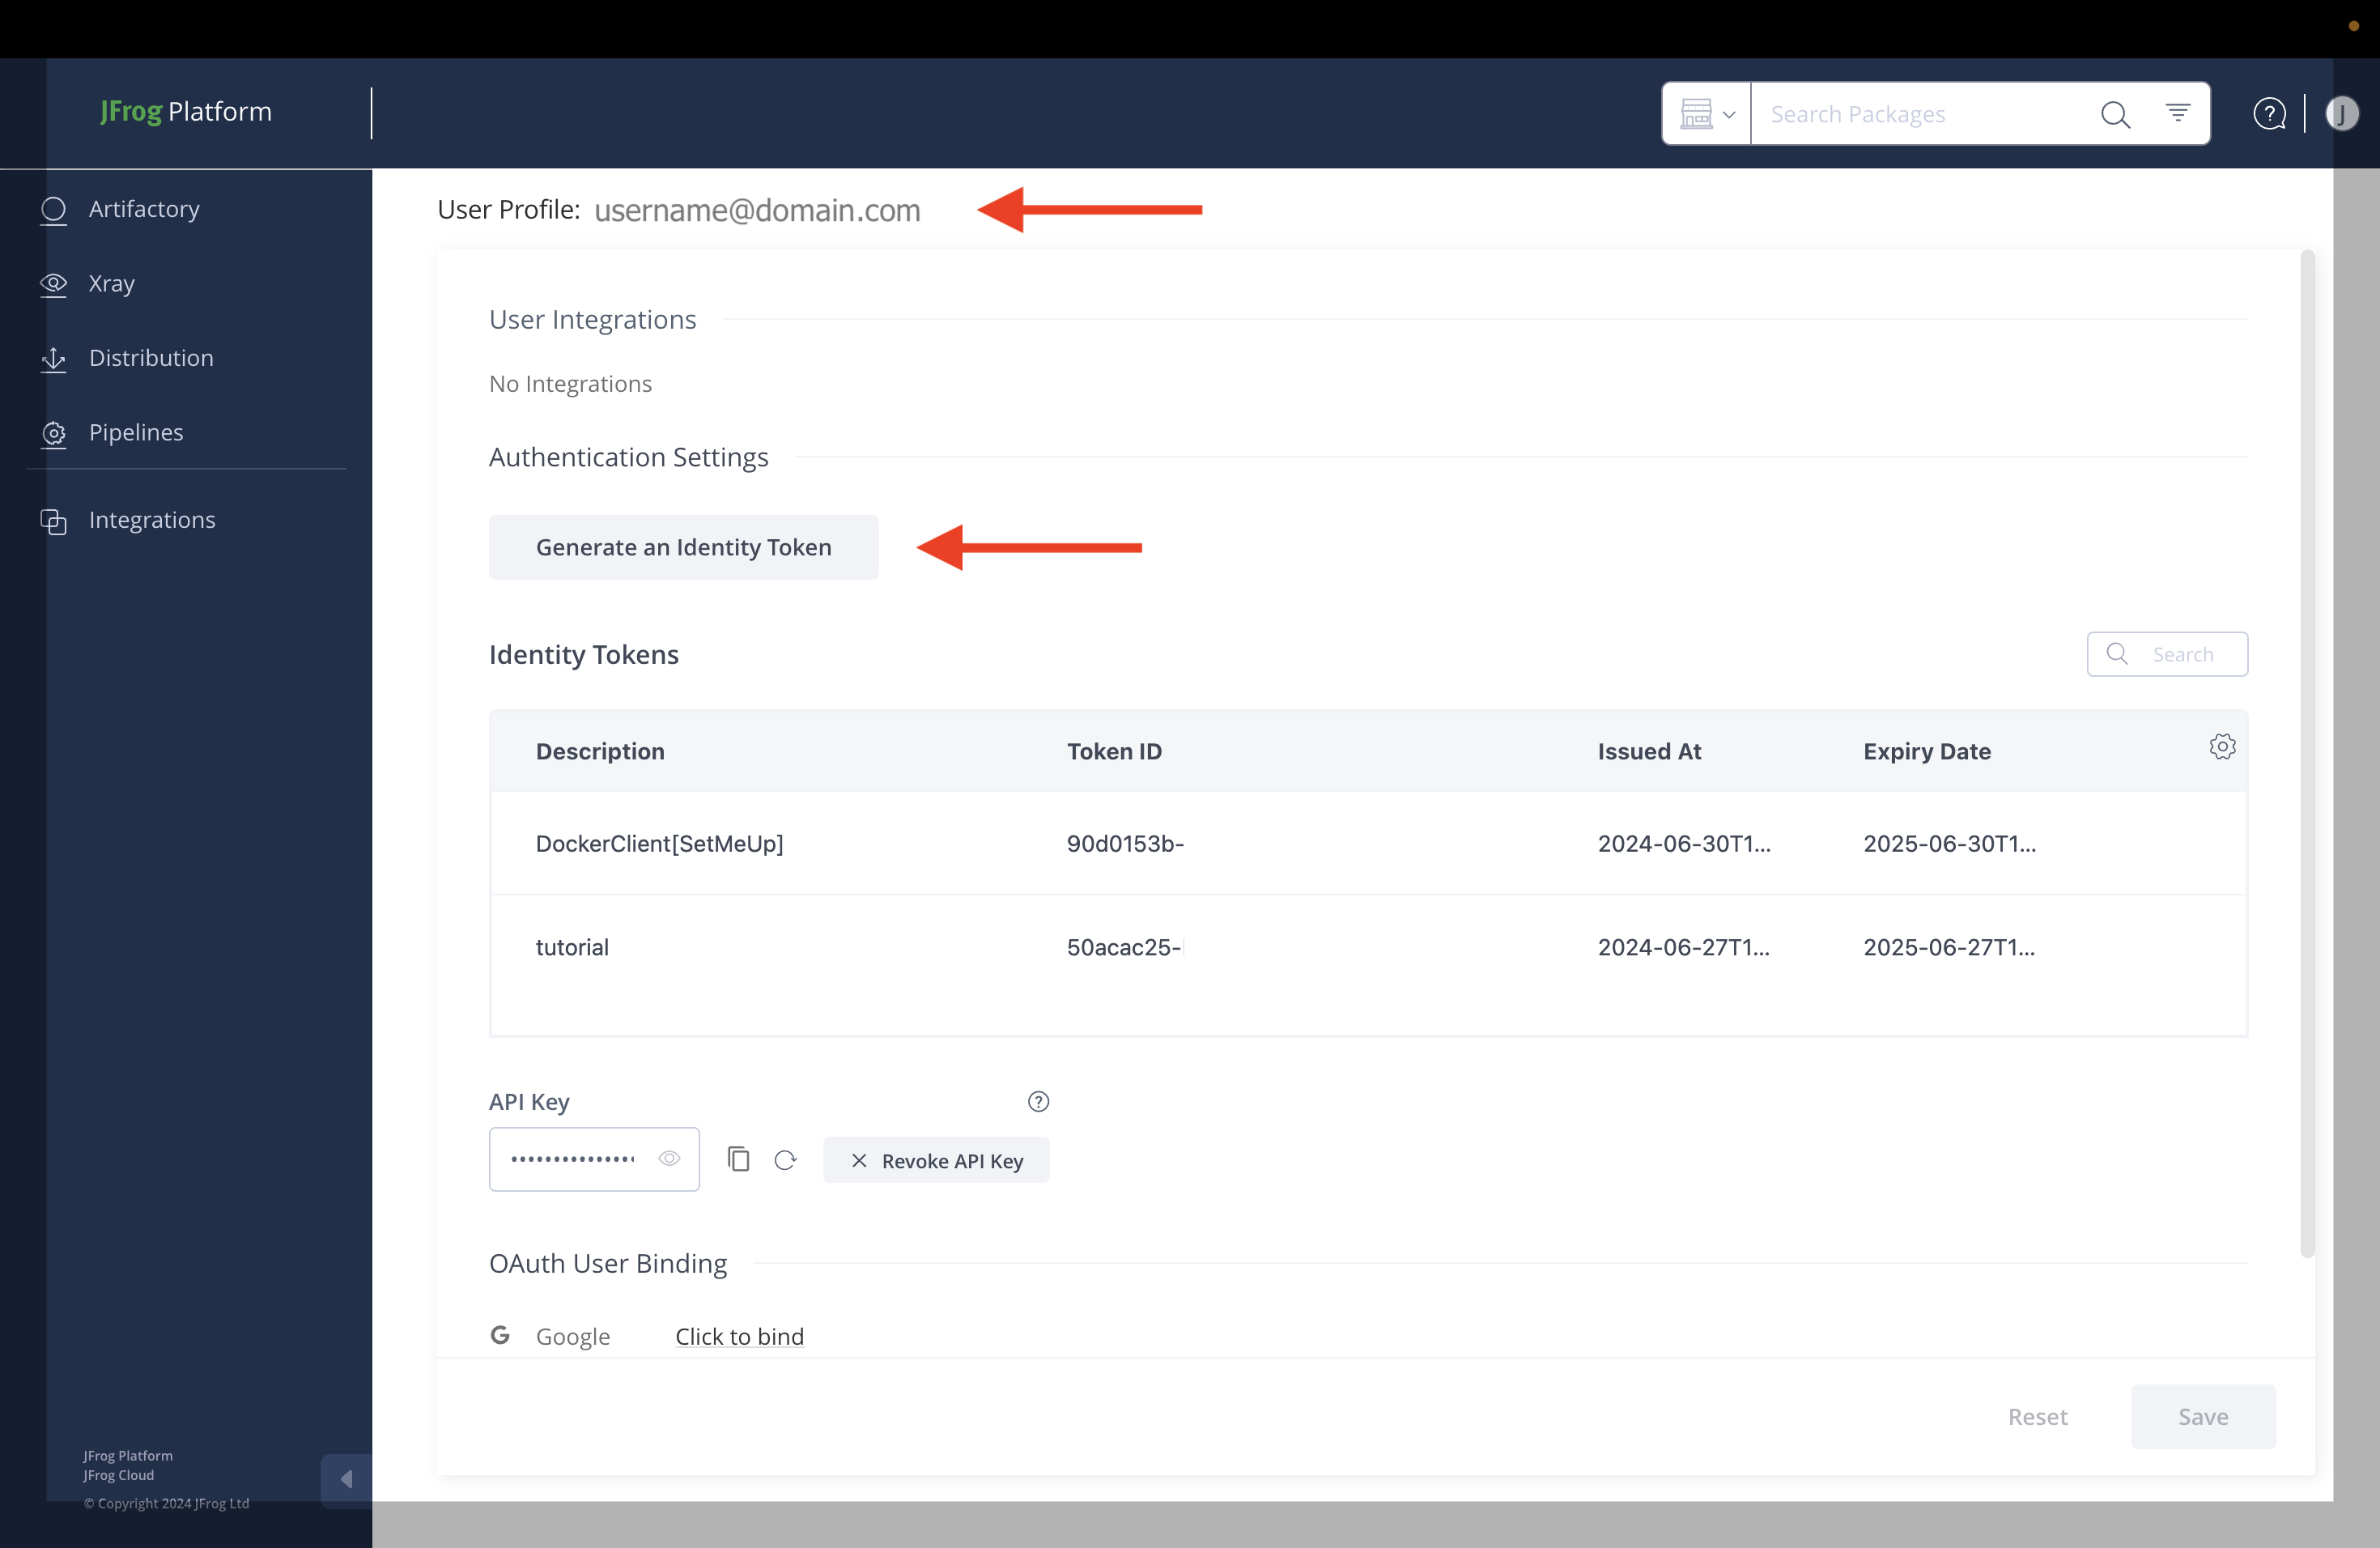
The user profile is displayed in the top left corner. This is most likely the email address you used to register an account. On the same screen, under “Authentication Settings” click the “Generate an Identity Token” button.
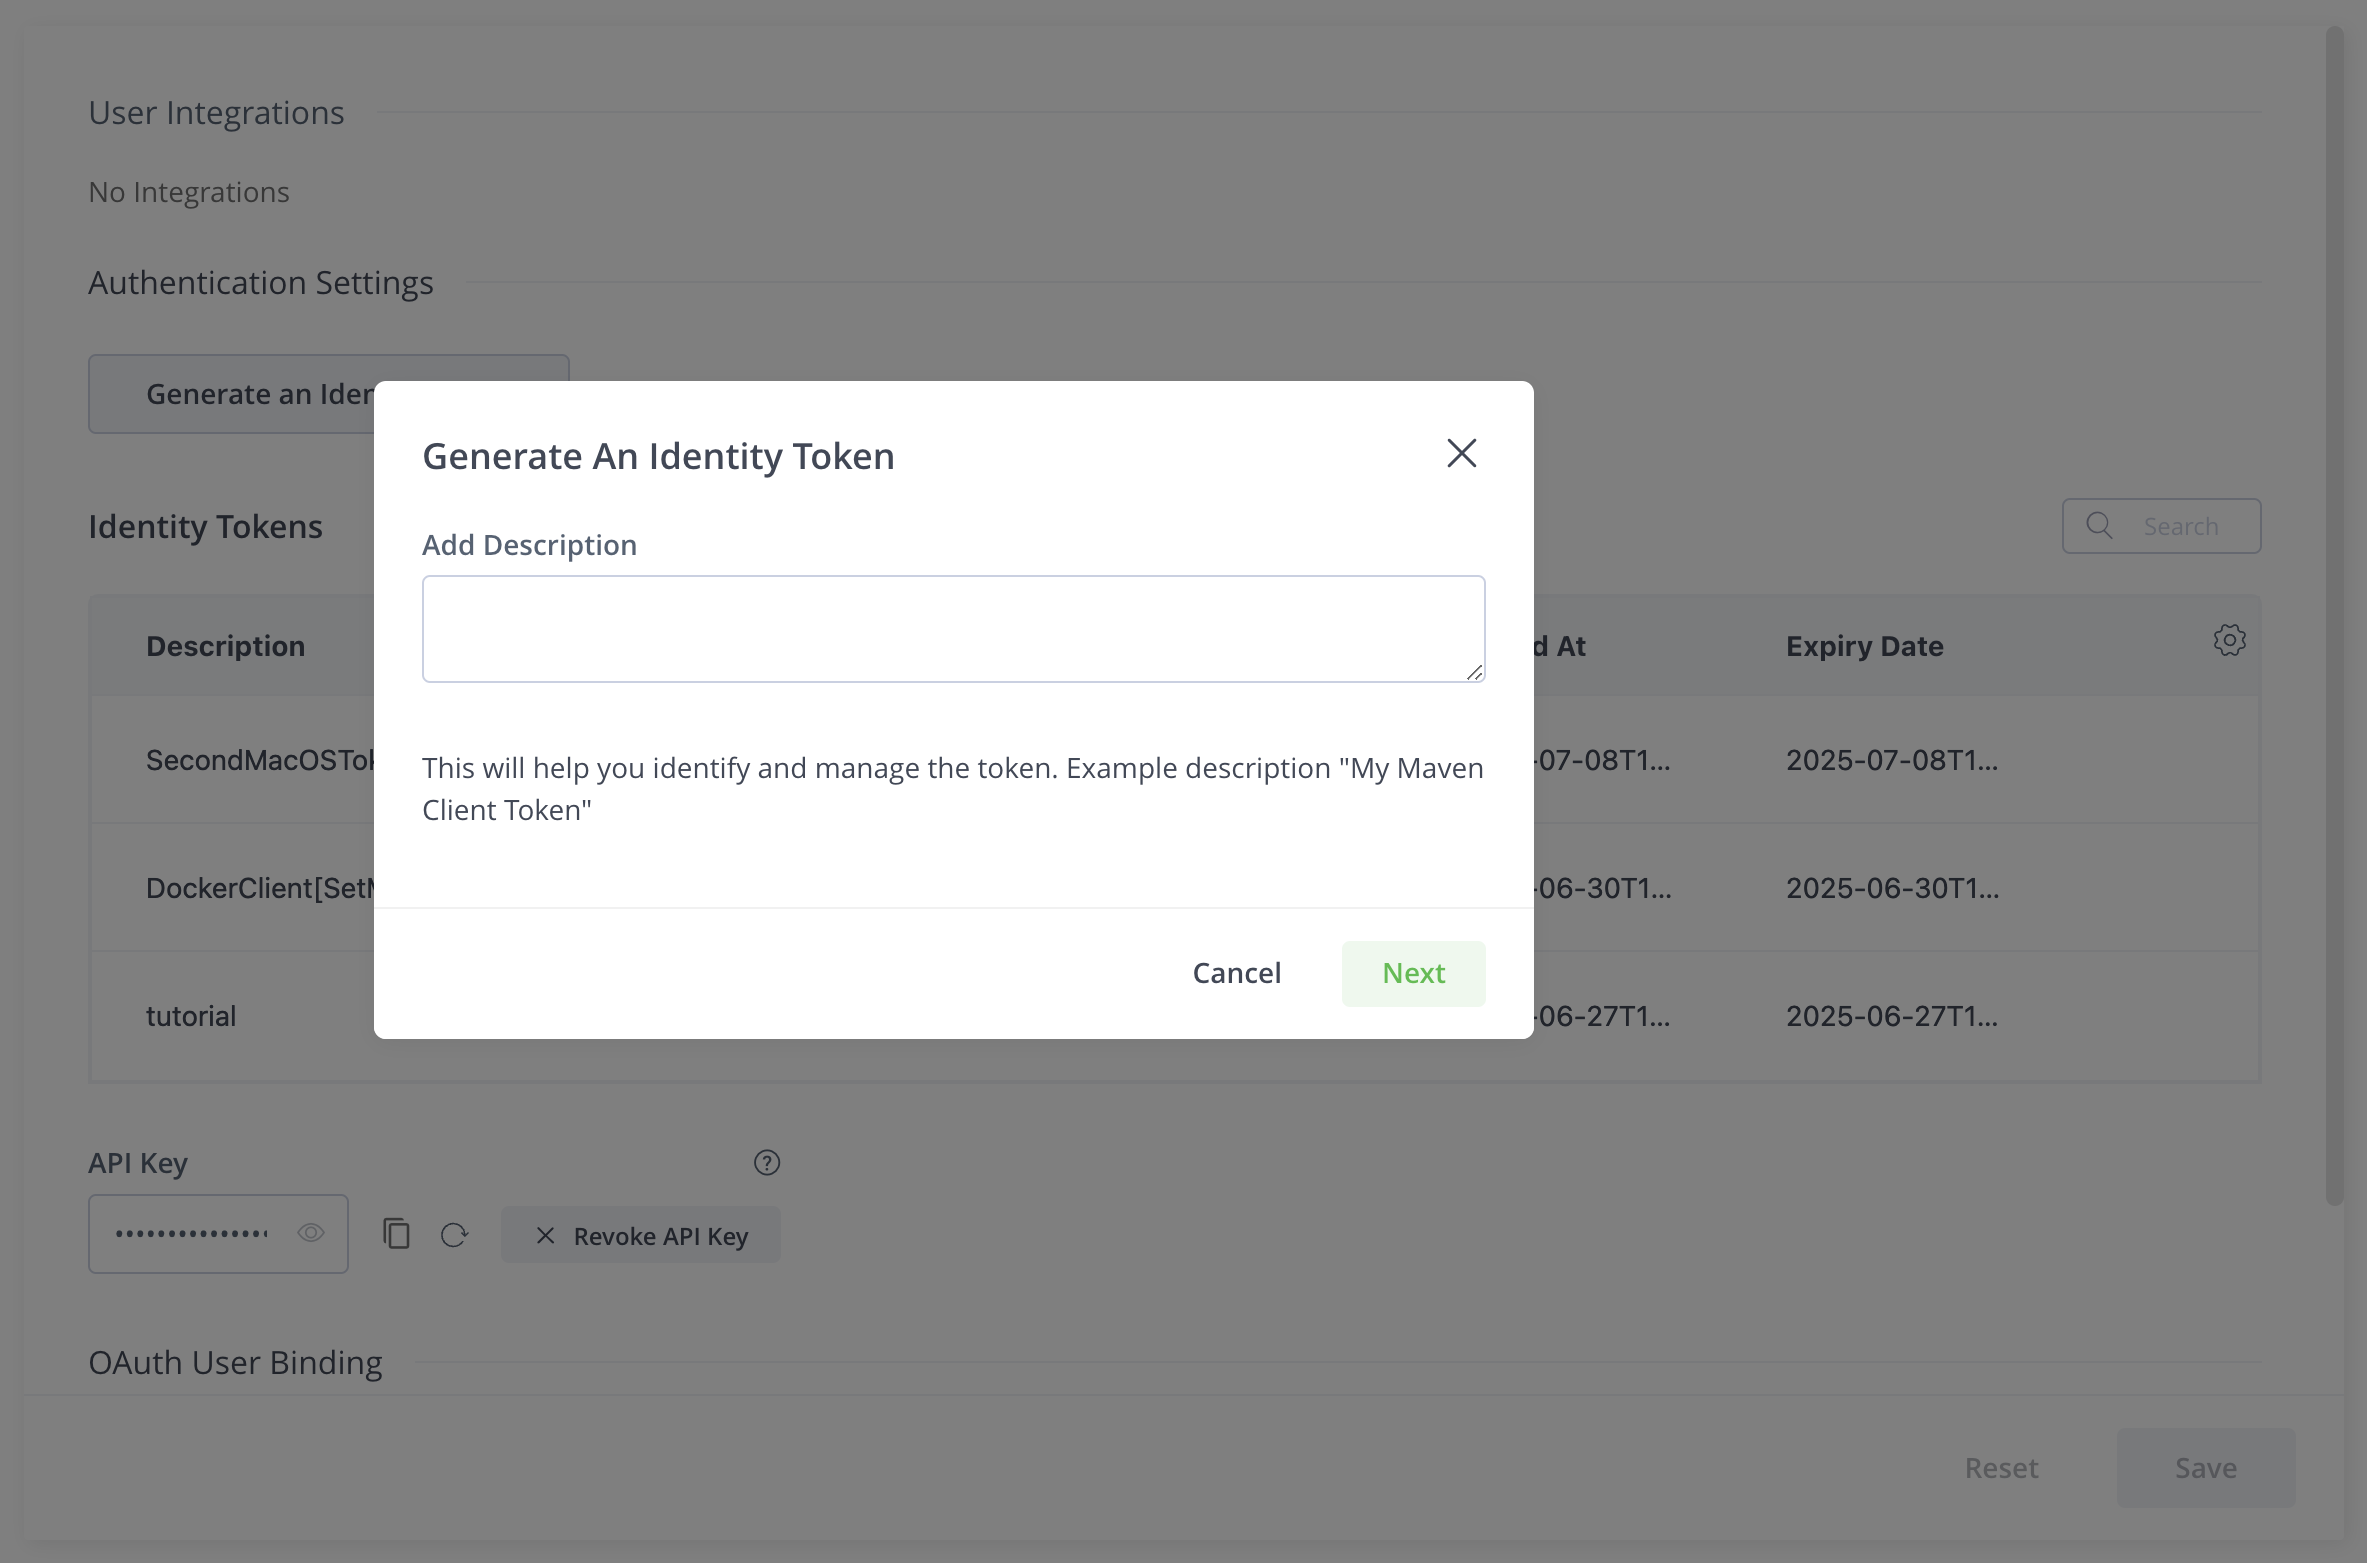
Enter a description to identify the token in the future, then select “Next.”
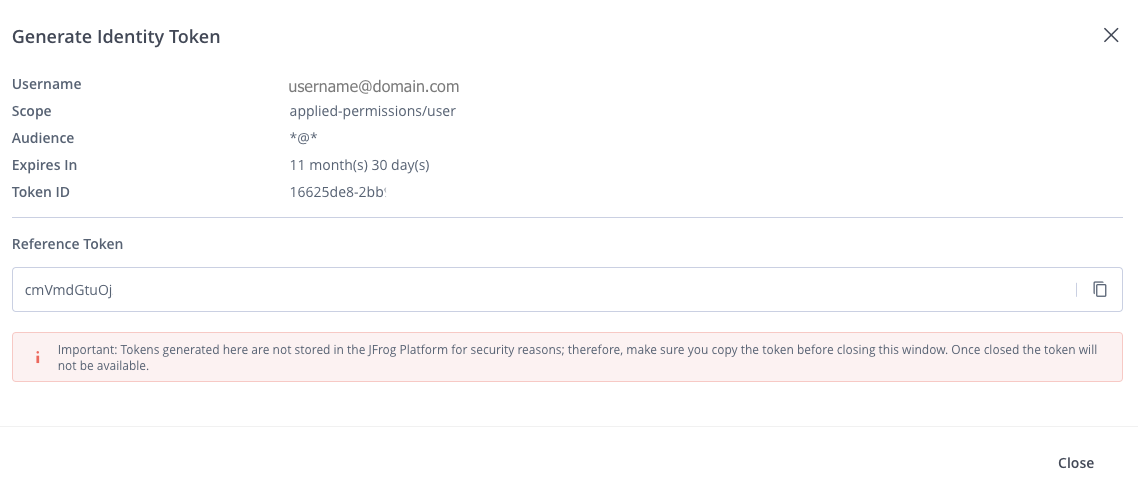
A token is generated and displayed. Copy the Reference Token. Store it in a safe place. The token cannot be retrieved after the window is closed.
Add the username and identity token credentials to a new file named
.envrc.private:vim .envrc.privateReplace the default values, but keep the quotation marks:
export ARTIFACTORY_USER="yourartifactoryusername"
export ARTIFACTORY_PASSWORD="yourartifactoryidentitytoken"
The following is an example of what the contents of the
.envrc.privatefile may look like. Replace the username with your email and the password with your identity token.export ARTIFACTORY_USER="user@domain.com" export ARTIFACTORY_PASSWORD="ijMDQ5ijd1MBW6fTwkZ0T"
This information is private and should not be committed to the repository. Check that
.envrc.privateis included in.gitignore:cat .gitignoreQuit and restart the terminal for the updates to take effect.
Verify the username and password are properly linked:
echo $ARTIFACTORY_PASSWORD | docker login digitalasset-http-json-docker.jfrog.io -u "$ARTIFACTORY_USER" --password-stdin
If successful, it returns “
Login Succeeded”.Note
Start the Docker engine if the command returns: “Cannot connect to the Docker daemon at unix:///Users/bame/.docker/run/docker.sock. Is the docker daemon running?”
From the root directory, run
direnv allow(This command may take several seconds to process):direnv allowThe output should look similar to the following. Details may differ, but you should see “
direnv: using flake_subdir” in the output:direnv: loading ~/../daml/daml-app-template/.envrc direnv: using flake_subdir evaluating derivation 'path:nix#devShells.aarch64-darwin.default' direnv: ([/opt/homebrew/bin/direnv export zsh]) is taking a while to execute. Use CTRL-C to give up. direnv: loading ~/../daml/daml-app-template/.envrc.vars direnv: loading ~/../daml/daml-app-template/.envrc.private direnv: export +AR +ARTIFACTORY_PASSWORD +ARTIFACTORY_USER +AS +AUTH0_DOMAIN +CC +CLASSPATH +CLOUDSDK_COMPUTE_REGION +CLOUDSDK_CORE_PROJECT +COMPOSE_FILE +CONFIG_SHELL +CXX ... +propagatedNativeBuildInputs +shell +shellHook +stdenv +strictDeps +system ~JAVA_HOME ~PATH ~XDG_DATA_DIRS
Install the Daml SDK
From the root directory, run the following command to install the Daml SDK:
curl -sSL https://get.daml.com/ | sh -s ${DAML_SDK_RELEASE_VERSION}
DAML_SDK_RELEASE_VERSIONrefers to the value in.envrc.vars. Use thecatcommand in the terminal to find the correct release version:cat .envrc.varsFind the version stored in
export DAML_SDK_RELEASE_VERSION=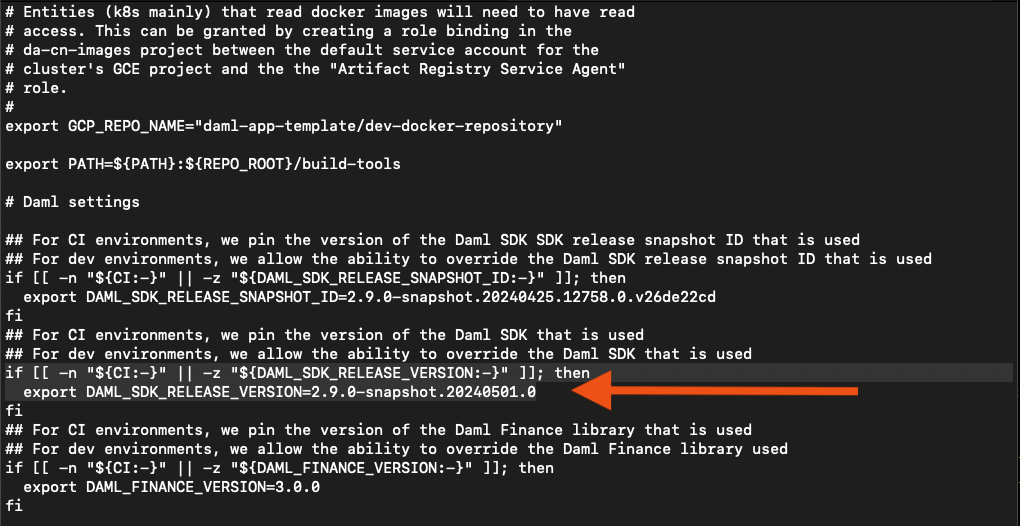
After installation, add Daml to your PATH in your shell configuration file (
.zshrcor.bashrcdepending on your system) if it was not added automatically:To edit the file in the terminal or PowerShell, enter
vim ~/.bashrcorvim ~/.zshrc.If you don’t know which shell your system runs, find the appropriate file by entering
ls -a ~/.in the command prompt.In the shell configuration file, add:
export PATH=$PATH:$HOME/.daml/bin
Save and exit the file then restart the terminal to complete the update.
Verify installation by entering
daml versionin the terminal. This should return the Daml SDK version.
Note
As part of the application front end build process, you may need to change the daml version in the file app/frontend/package-lock.json.
For example, if the old version was 2.9.0 and you want to move to 2.9.5, then a code snippet like this:
"generated/daml.js/40f452260bef3f29dede136108fc08a88d5a5250310281067087da6f0baddff7": {
      "name": "@daml.js/40f452260bef3f29dede136108fc08a88d5a5250310281067087da6f0baddff7",
      "version": "2.9.0",
      "license": "UNLICENSED",
      "dependencies": {
May need to change to:
"generated/daml.js/40f452260bef3f29dede136108fc08a88d5a5250310281067087da6f0baddff7": {
      "name": "@daml.js/40f452260bef3f29dede136108fc08a88d5a5250310281067087da6f0baddff7",
      "version": "2.9.5",
      "license": "UNLICENSED",
      "dependencies": {
Multiple replacements may be needed.
Build and Test
Daml Finance Dar files are automatically fetched, cached, and managed by Gradle, with versioning defined within the app/daml/build.gradle.kts file.
Verify that the Gradle Build Tool is installed by checking the version in the project’s root directory:
./gradlew -vSample output:
daml-app-template ~ % ./gradlew -v

------------------------------------------------------------
Gradle 8.2.1
------------------------------------------------------------

Build time:   2023-07-10 12:12:35 UTC
Revision:     a38ec64d3c4612da9083cc506a1ccb212afeecaa

Kotlin:       1.8.20
Groovy:       3.0.17
Ant:          Apache Ant(TM) version 1.10.13 compiled on January 4 2023
JVM:          17.0.3 (Azul Systems, Inc. 17.0.3+7-LTS)
OS:           Mac OS X 13.6.1 aarch64
If the command fails, install Gradle by following the Gradle Build Tool installation instructions.
Build the
daml-app-template.daranddaml-app-template-tests.darfiles from the sources:./gradlew :app:daml:assembleTest all of the Daml test dars in the root directory. Tests should return
BUILD SUCCESSFUL:./gradlew :app:daml:test

