
Install Canton
This guide will guide you through the process of setting up your Canton nodes to build a distributed Daml ledger. You will learn the following:
- How to set up and configure a participant node
- How to set up and configure an embedded or distributed sync domain
- How to connect a participant node to a sync domain
A single Canton process can run multiple nodes, which is very useful for testing and demonstration. In a production environment, you typically run one node per process.
This guide uses the reference configurations you can find in the release bundle under config
and explains how to leverage these examples for your purposes. Therefore, any file named in this guide
refers to subdirectories of the reference configuration example.
Hardware Resources
Adequate hardware resources need to be available for each Canton node in a test, staging, or production environment. It is recommended to begin with a potentially over-provisioned system. Once a long running, performance benchmark has proven that the application’s NFRs can be met (e.g., application request latency, PQS query response time, etc.) then decreasing the available resources can be tried, with a follow up rerun of the benchmark to confirm the NFRs can still be met. Alternatively, if the NFRs are not met then the available resources should be increased.
As a starting point, the minimum recommended resources are:
- The physical host, virtual machine, or container has 6 GB of RAM and at least 4 CPU cores.
- The JVM has at least 4 GB RAM.
Also, you may want to add -XX:+UseG1GC to force the JVM to to use the
G1 garbage collector. Experience has shown that the JVM may use a
different garbage collector in a low resource situation which can result in
long latencies.
Downloading Canton
The Canton Open Source version is available from Github.
Daml Enterprise includes an enterprise version of the Canton ledger. If you have entitlement to Daml Enterprise you can download the enterprise version of Canton by following the Installing Daml Enterprise instructions and downloading the appropriate Canton artifact.
You can also use the Daml Enterprise Canton Docker images by following our Docker instructions.
Your Topology
The first question we need to address is what the topology is that you are going after. The Canton topology is made up of parties, participants and sync domains, as depicted in the following figure.
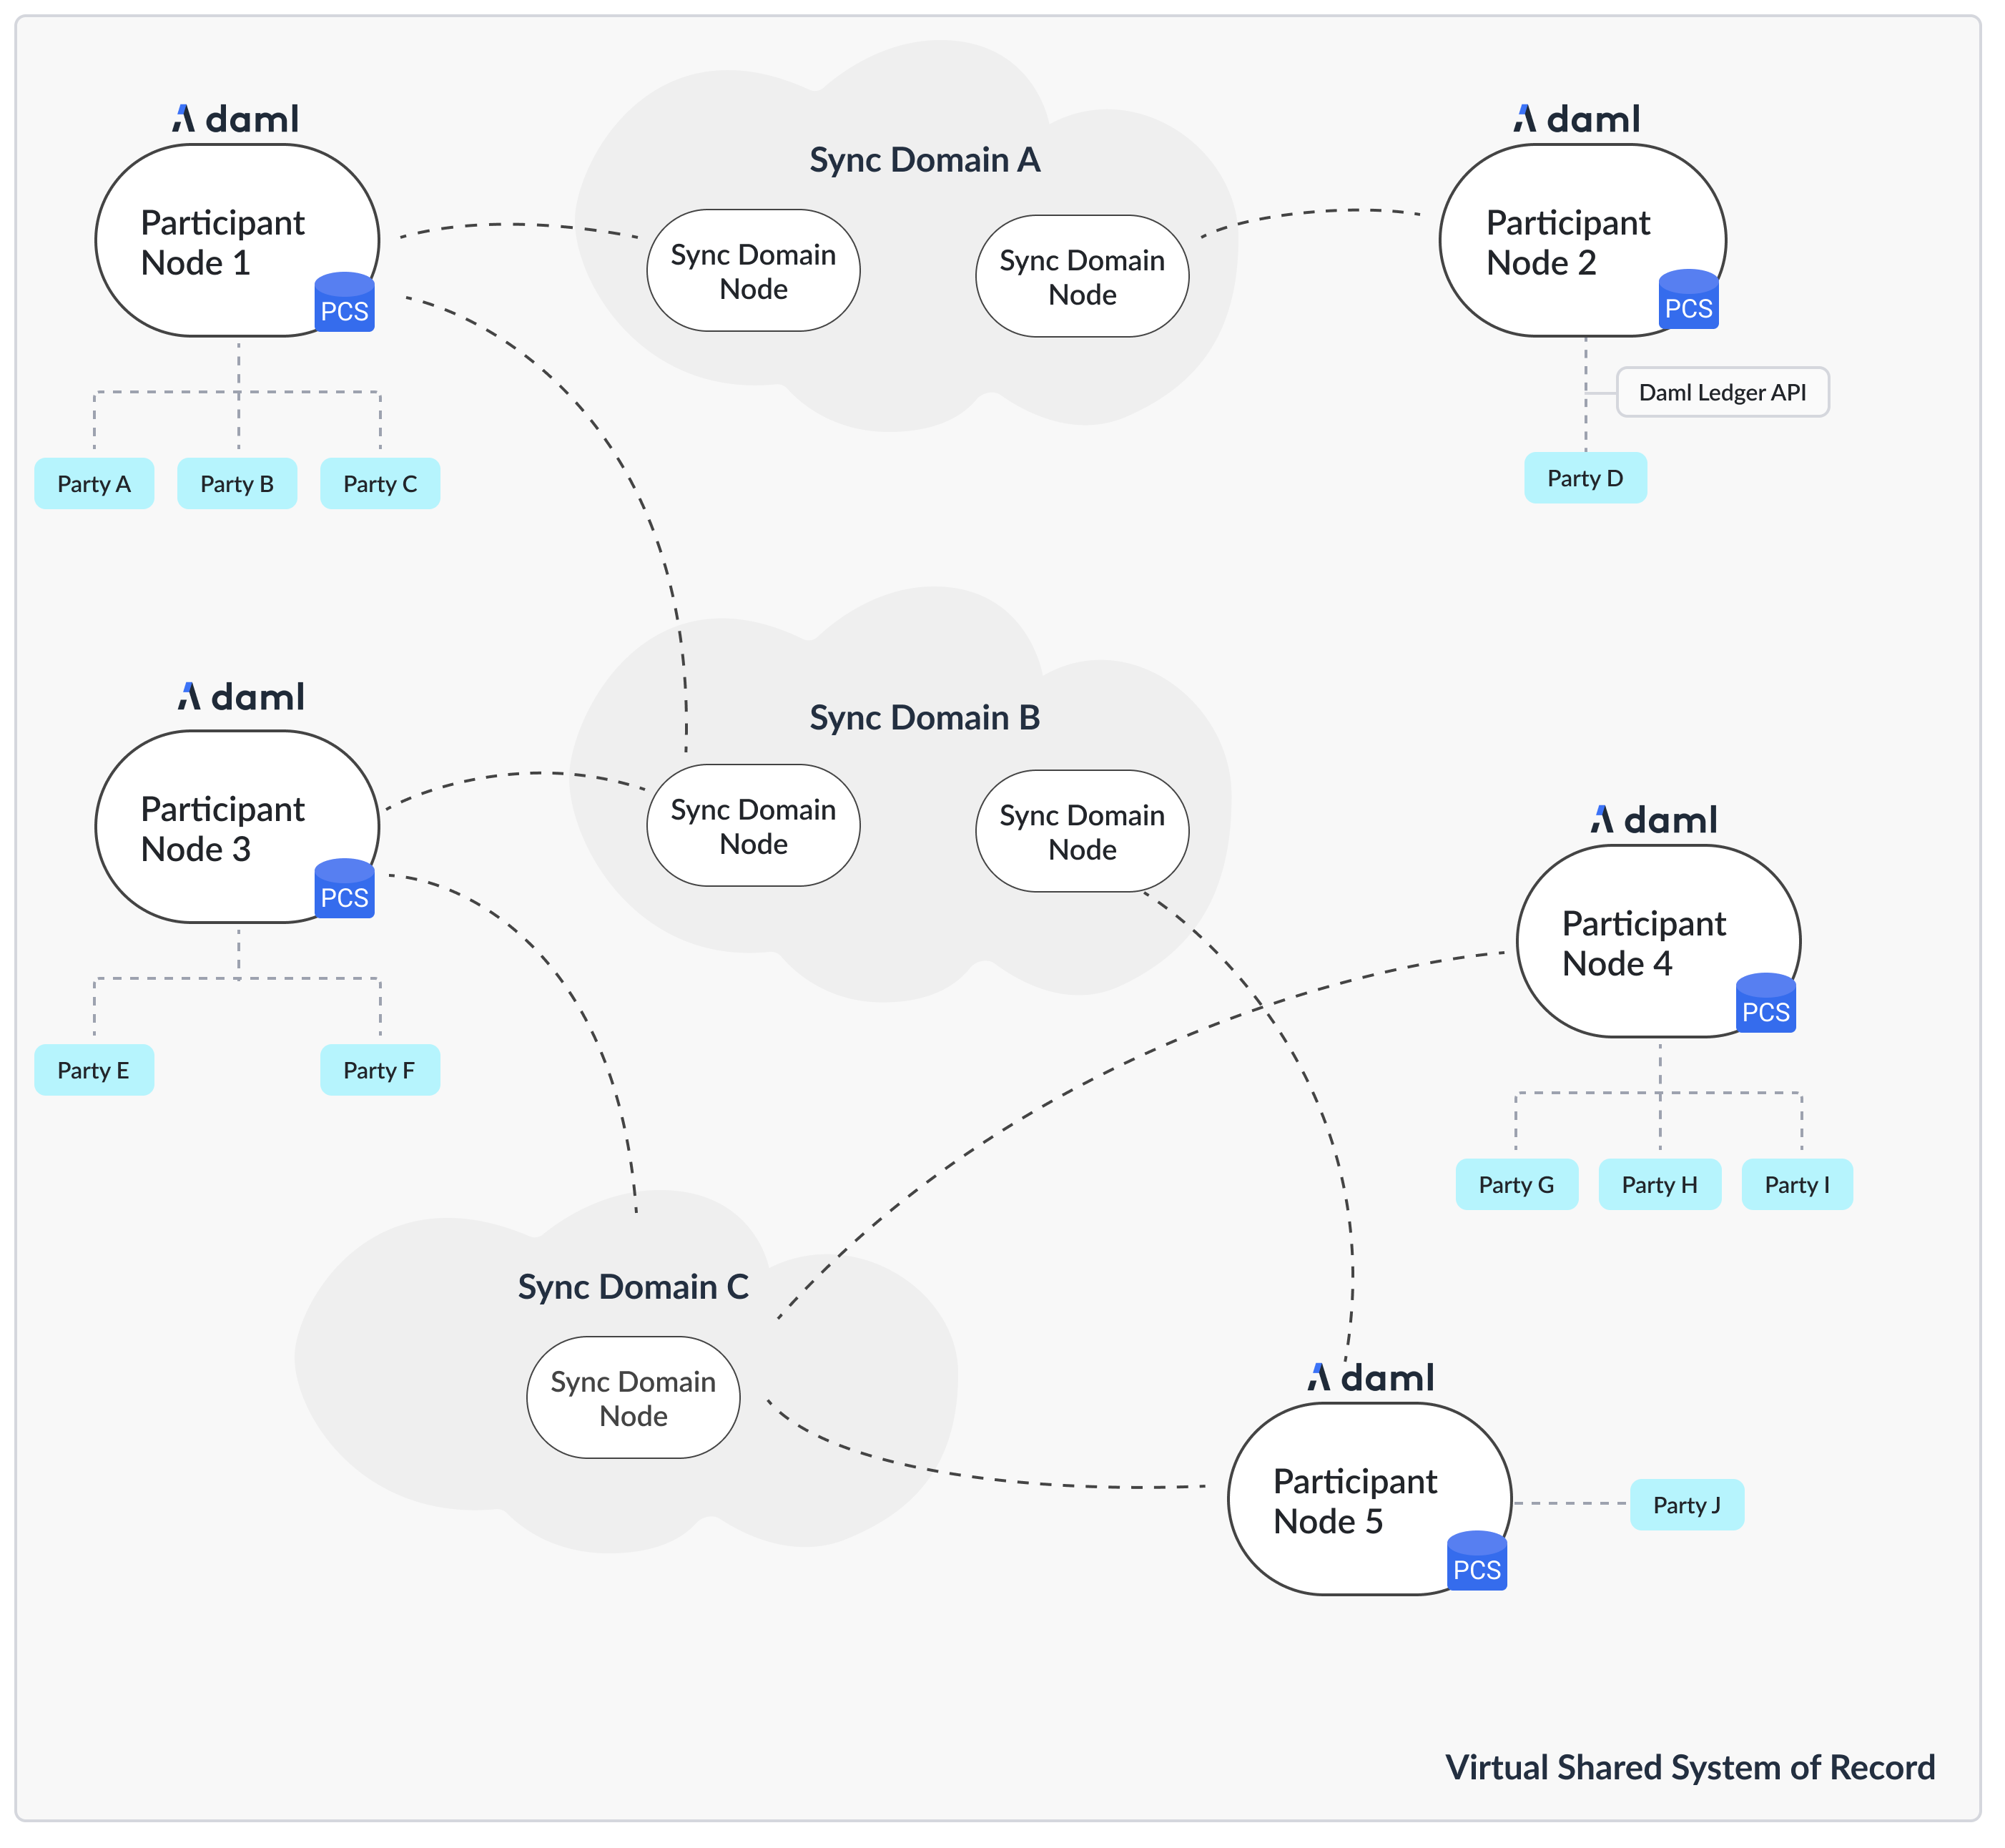
The Daml code runs on the participant node and expresses smart contracts between parties. Parties are hosted on participant nodes. Participant nodes synchronize their state with other participant nodes by exchanging messages with each other through sync domains. Sync domains are nodes that integrate with the underlying storage technology such as databases or other distributed ledgers. As the Canton protocol is written in a way that assumes that participant nodes don’t trust each other, you would normally expect that every organization runs only one participant node, except for scaling purposes.
If you want to build up a test network for yourself, you need at least a participant node and a sync domain.
The following instructions assume that you are running all commands in the root directory of the release bundle:
cd ./canton-<type>-X.Y.Z
The Config Directory Contents
Important
This section applies to 2.8.1 and later releases.
The config directory contains a set of reference configuration files, one per node type:
.
└── config
      ├── shared.conf, sandbox.conf, participant.conf, domain.conf, sequencer.conf, mediator.conf
      ├── jwt
      ├── misc
      ├── monitoring
      ├── remote
      ├── storage
      ├── tls
      └── utils
participant.conf: a participant node configurationsequencer.conf,mediator.conf,manager.conf: a sequencer, mediator, and manager node configuration for a Daml Enterprise sync domain deployment.domain.conf: an embedded sync domain, which runs the three sync domain processes in one node (the only open source sync domain option).sandbox.conf: a simple setup for a single participant node connected to a single sync domain node, using in-memory stores for testing.
In addition, you’ll find the following files and directories:
shared.conf: a shared configuration file that is included by all other configurations.jwt: contains JWT configuration files for the Ledger API.misc: contains miscellaneous configuration files useful for debugging and development.monitoring: contains configuration files to enable metrics and tracing.remote: contains configuration files to connect Canton console to remote nodes.storage: a directory containing storage configuration files for the various storage options.tls: contains TLS configuration files for the various APIs and a script to generate test certificates.utils: contains utility scripts, mainly to set up the database.
Selecting your Storage Layer
In order to run any kind of node, you need to decide how and if you want to persist the
data. You can choose not to persist data and instead use in-memory stores that are deleted on node restart,
or you can persist data using Postgres or Oracle databases.
Note
Multiple versions of Postgres are tested for compatibility with Canton and PQS in traditional deployment configurations. Postgres comes in many varieties that allow NFR trade-offs to be made (e.g., latency Vs. read operation scaling Vs. HA Vs. cost). Not all of these variants are tested for compatibility but all are expected to work with Canton and PQS. However, sufficient application testing is required to ensure that the SLAs of the ledger API and PQS clients are met. In particular, serverless Postgres has transient behaviors which require a robust application testing process to verify that application SLAs are met (e.g., transaction latency is not greatly impacted by auto-scaling).
For this purpose, there are some storage mixin configurations (config/storage/) defined.
These storage mixins can be used with any of the node configurations. All the reference examples include the config/shared.conf,
which in turn by default includes postgres.conf. Alternatively, the in-memory configurations just work out of the
box without further configuration, but won’t persist any data. You can change the include within
config/shared.conf.
The mixins work by defining a shared variable, which can be referenced by any node configuration
storage = ${_shared.storage}
storage.parameters.databaseName = "canton_participant"
If you ever see the following error: Could not resolve substitution to a value: ${_shared.storage}, then
you forgot to add the persistence mixin configuration file.
Note
Please also consult the more detailed section on persistence configurations.
Canton will manage the database schema for you. You don’t need to create any tables or indexes.
Persistence using Postgres
While in-memory is great for testing and demos, for any production use, you’ll need to use a database as a persistence layer. Both the community version and the enterprise version support Postgres as a persistence layer. Daml Enterprise also supports Oracle as the persistence backend, but Postgres is recommended, which is used in the following instructions.
Make sure you have a running Postgres server. Create one database per node.
Canton is tested on a selection of the currently supported Postgres versions. See the Canton release notes for the specific Postgres version used to test a particular Canton release.
Creating the Database and the User
In util/postgres you can find a script db.sh which helps configure the database, and optionally
start a Docker-based Postgres instance. Assuming you have Docker installed, you
can run:
cd ./config/util/postgres
./db.sh start [durable]
./db.sh setup
The db.sh will read the connection settings from config/util/postgres/db.env if they aren’t already set by environment variables.
The script will start a non-durable Postgres instance (use start durable if you want to keep the data between restarts),
and create the databases defined in config/util/postgres/databases.
Other useful commands are:
create-user: To create the user as defined indb.env.resume: To resume a previously stopped Docker-based Postgres instance.drop: Drop the created databases.
Configure the Connectivity
You can provide the connectivity settings either by editing the file config/storage/postgres.conf or by setting
respective environment variables (see the file for which ones need to be set):
export POSTGRES_HOST="localhost"
export POSTGRES_USER="test-user"
export POSTGRES_PASSWORD="test-password"
export POSTGRES_DB=postgres
export POSTGRES_PORT=5432
Tuning the Database
Please note that Canton requires a properly sized and correctly configured database. Please consult the Postgres performance guide for further information.
Generate the TLS Certificates
The reference example configurations use TLS to secure the APIs. You can find the configuration files in
config/tls. The configuration files are split by different APIs. The configuration files are:
tls-ledger-api.conf: TLS configuration for the Ledger API, exposed by the participant node.mtls-admin-api.conf: TLS configuration for the Administration API, exposed by all node types.tls-public-api.conf: TLS configuration for the Public API, exposed by the sequencer and sync domain node.
The client authentication on the Public API is built in and cannot be disabled. It uses specific signing keys associated with the node’s identity. The Ledger API supports JWT based authentication. On the Admin API, you can enable mTLS. Please consult the TLS documentation section for further information.
If you want to start with a simple setup, you can use the provided script config/tls/gen-test-certs.sh to generate
a set of self-signed certificates (which must include the correct SAN entries for the address the node will bind to).
Alternatively, you can also skip this step by commenting out the TLS includes in the respective configuration files.
Setting up a Participant
Start your participant by using the reference example config/participant.conf:
./bin/canton [daemon] -c config/participant.conf
The argument daemon is optional. If omitted, the node will start with an interactive console. There are
various command line options available, for example to further tune the logging configuration.
Note
By default, the node will initialize itself automatically using the identity commands Topology Administration. As a result, the node will create the necessary keys and topology transactions and will initialize itself using the name used in the configuration file. Please consult the identity management section for further information.
This was everything necessary to start up your participant node. However, there are a few steps that you want to take care of in order to secure the participant and make it usable.
Secure the APIs
- By default, all APIs in Canton are only accessible from localhost. If you want to connect to your node from other
machines, you need to bind to
0.0.0.0instead of localhost. You can do this by settingaddress = 0.0.0.0or to the desired network name within the respective API configuration sections. - All nodes are managed through the administration API. Whenever you use the console, almost all requests will go through the administration API. It is recommended that you set up mutual TLS authentication as described in the TLS documentation section.
- Applications and users will interact with the participant node using the ledger API. We recommend that you secure your
API by using TLS. You should also authorize your clients using JWT tokens.
The reference configuration contains a set of configuration files in
config/jwt, which you can use as a starting point.
Configure Applications, Users and Connection
Canton distinguishes static from dynamic configuration.
- Static configuration are items which are not supposed to change and are therefore captured in the configuration file. An example is to which port to bind to.
- Dynamic configuration are items such as Daml archives (DARs), sync domain connections, or parties. All such changes are effected through console commands (or the administration APIs).
If you don’t know how to connect to sync domains, onboard parties, or provision Daml code, please read the getting started guide.
Setting up a Synchronization Domain
Your participant node is now ready to connect to other participants to form a distributed ledger. The connection is facilitated by a sync domain, which is formed by three separate processes:
- a sequencer, which is responsible for ordering encrypted messages
- a mediator, which is responsible for aggregating validation responses by the individual participants
- a sync domain manager, which is responsible for verifying the validity of topology changes (distributed configuration changes) before they are distributed on the sync domain
These nodes don’t store any ledger data, but just facilitate the communication between the participants.
In order to set up a sync domain, you need to decide what kind of driver you want to use for the sequencer. Drivers are provided for different infrastructure types. These drivers have different levels of fidelity in terms of trust and performance. Your current options are the following:
- Postgres-based sync domain
- Oracle-based sync domain
- Hyperledger Fabric-based sync domain
- Ethereum-based sync domain
In the near future, there will also be a native Canton BFT driver (which will be used for the Canton Network).
This section explains how to set up a Postgres-based synchronization sync domain. Please consult the Enterprise driver section with respect to the other drivers.
Using an Embedded Synchronization Domain
The simplest way to run a sync domain is to use the embedded configuration which runs all three processes in a single node. Using the same storage (but different database name) as configured for the participant node, you can start the sync domain using:
./bin/canton -c config/domain.conf
The embedded sync domain is your only choice if you are using the community version of Canton. It supports crash recovery, but not high availability.
Using Microservices
If you are using Daml Enterprise, you can start the sync domain processes as separate microservices:
./bin/canton daemon -c config/[mediator|sequencer|manager].conf
Before the nodes work together, they need to be initialized and connected. Consult the detailed guide on how to bootstrap a sync domain.
Generally, you can connect the nodes using either the embedded console (if they run in the same process) or through the remote console:
./bin/canton -c config/remote/mediator.conf,config/remote/manager.conf,config/remote/sequencer.conf
Subsequently, just run the boostrap command:
manager.setup.bootstrap_domain(sequencers.all, mediators.all)
Connect the Participant
The final step is to connect the participant to the sync domain. Refer to the connectivity guide for detailed instructions. In the simplest case, you just need to run the following command in the participant’s console:
participant.domains.connect("domain", "https://localhost:10018", certificatesPath = "config/tls/root-ca.crt")
The certificate is explicitly provided, as the self-signed test certificates are not trusted by default.
Secure the APIs
- As with the participant node, all APIs bind by default to localhost. If you want to connect to your node from other
machines, you need to bind to the right interface or to
0.0.0.0. - The administration API should be secured using client certificates as described in TLS documentation section.
- The public API needs to be properly secured using TLS. Please follow the corresponding instructions.
Next Steps
The above configuration provides you with an initial setup. Without going into details, the next steps would be:
- Control who can join the sync domain by configuring the sync domain to be permissioned (default is “everyone can join”).
- Create high availability setups for your sync domain or your participants.
Multi-Node Setup
If desired, you can run many nodes in the same process. This is convenient for testing and demonstration purposes. You can either do this by listing several node configurations in the same configuration file or by invoking the Canton process with several separate configuration files (which get merged together).
./bin/canton -c config/participant.conf -c config/sequencer.conf,config/mediator.conf -c config/manager.conf